V2RaySocks
V2RaySocks is a WHMCS Provisioning Module, which makes it possible for WHMCS to sell V2Ray services.u can think of V2Ray as the most powerful VPN at present, even in areas with more serious network censorship, such as China, the government and regulatory agencies cannot identify and decrypt any of its data!

Protocols supported by V2RaySocks
| protocol | whether to support |
|---|---|
| vmess | yes |
| trojan | yes |
| vless | yes |
| shadowsocks | yes |
| shadowsocks2022 | yes |
| hysteria2 | yes |
| shadowsocksR | no |
Feature
Protocols supported
V2RaySocks supports five main types of protocols, all of which utilize TLS encryption to secure data transmission. Presently, data encrypted through this technology remains inaccessible for decryption by any individual or organization.
- VMess
- VLESS
- Shadowsocks
- Trojan
- Hysteria2
Supported functions
For client
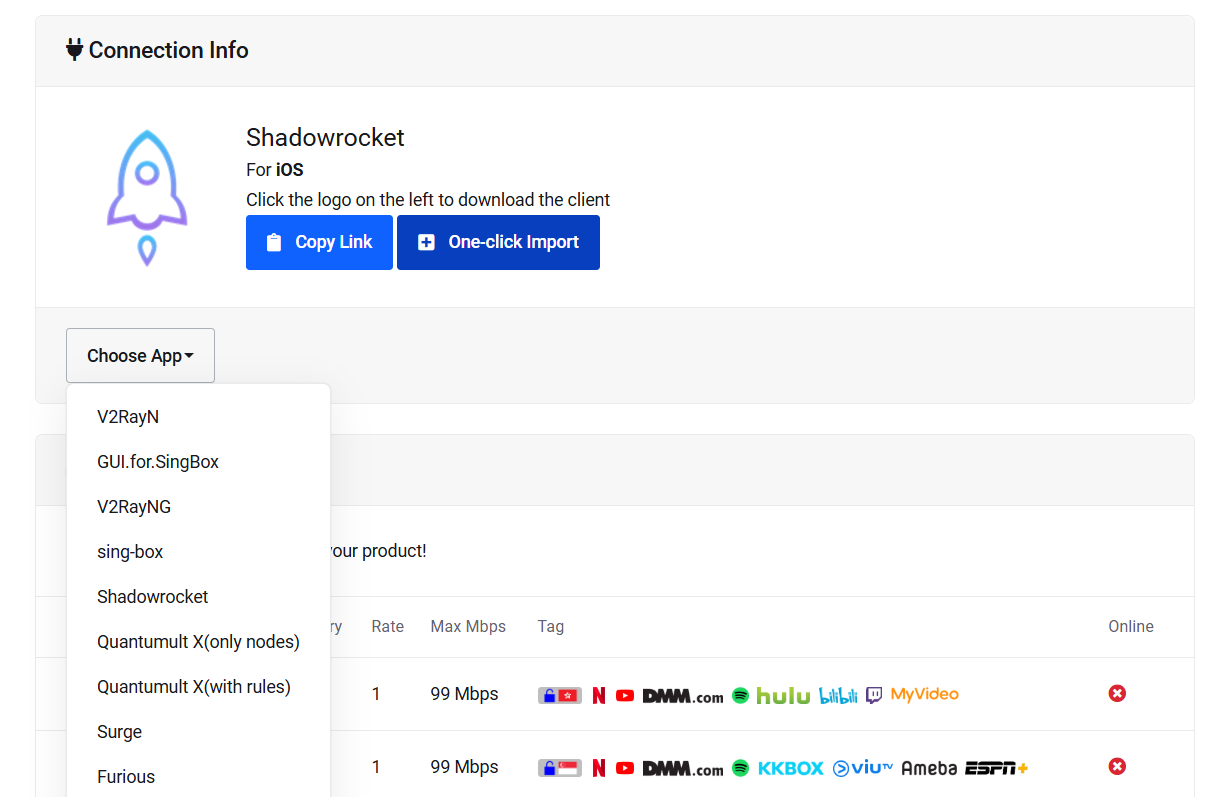
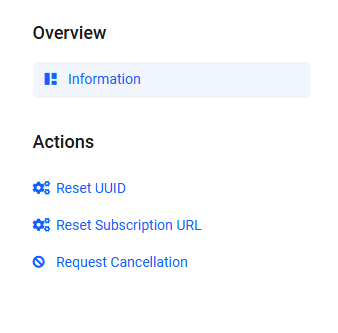
- Basic Information Display
- Subscription Link Support
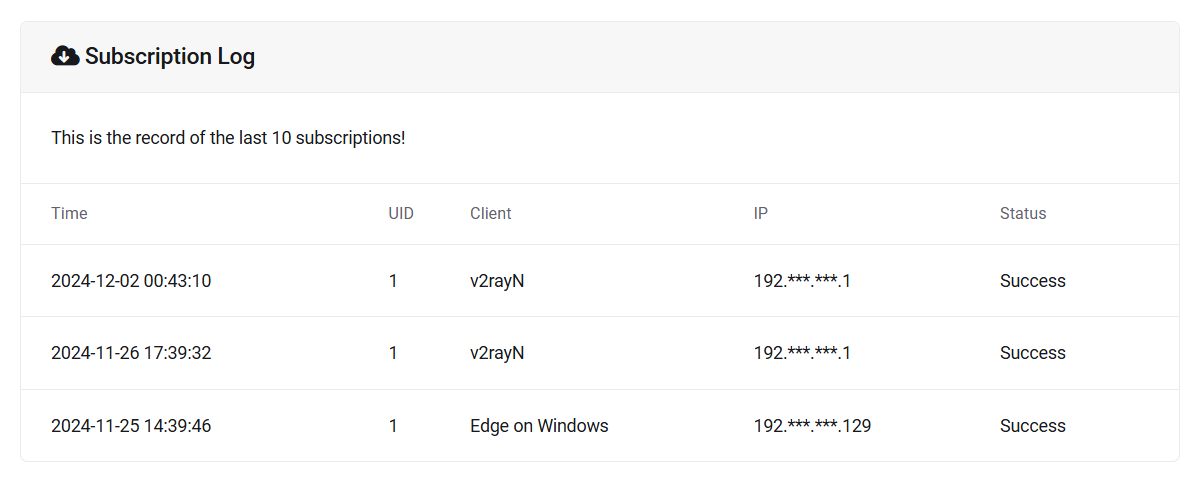
- Subscription Retrieval Records
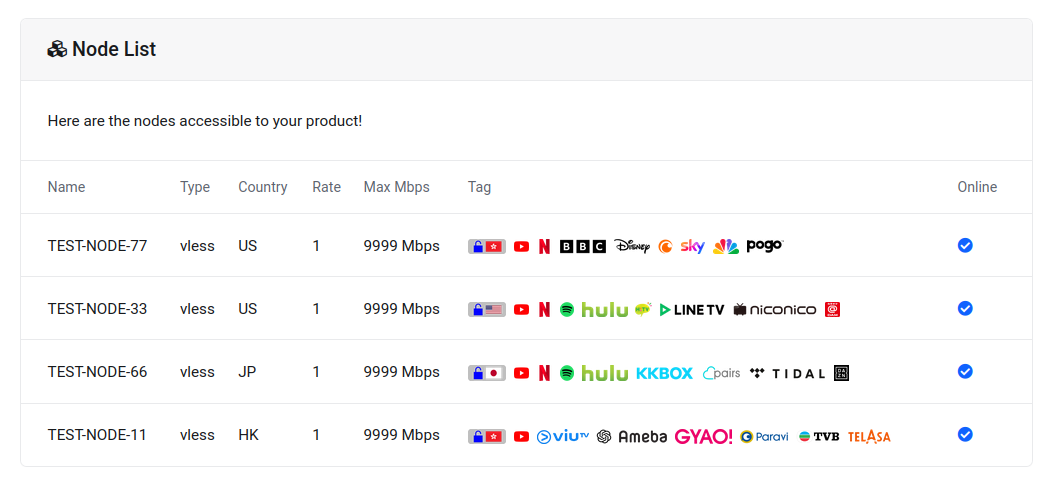
- Node List Display
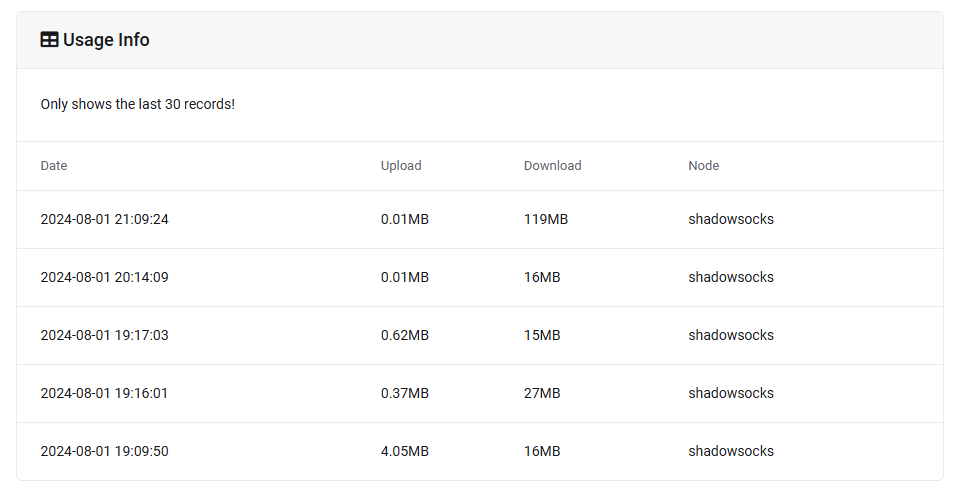
- Usage Logs Display
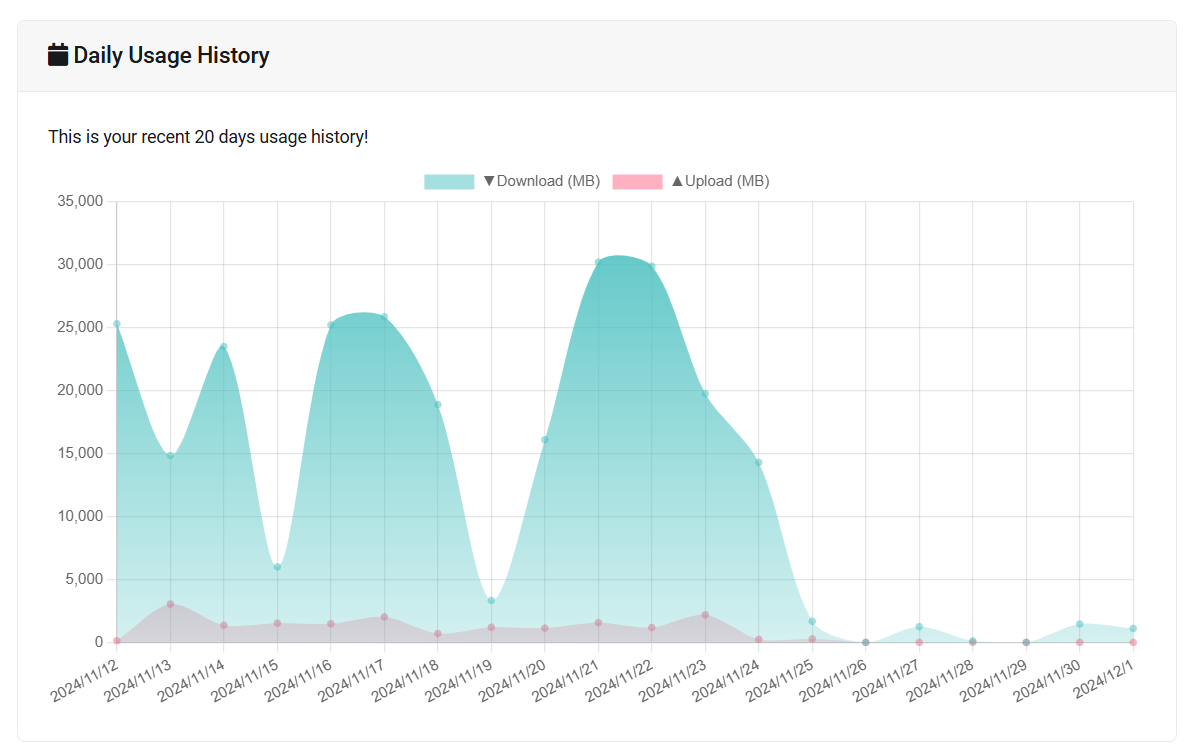
- Daily Records Display
- Reset UUID
- Reset Subscription Link
- Subscription Leak Alert
- Client APP Download
- Full Multi-language Support
- One-click Import
And all other WHMCS' features
V2RaySocks offers an API on the product details page, featuring product information, node list, client details, and recent usage records in JSON format. This facilitates the development of your customized product details page.
clientarea.php?action=productdetails&id=444&v2raysocksact=getuserinfo
For merchant
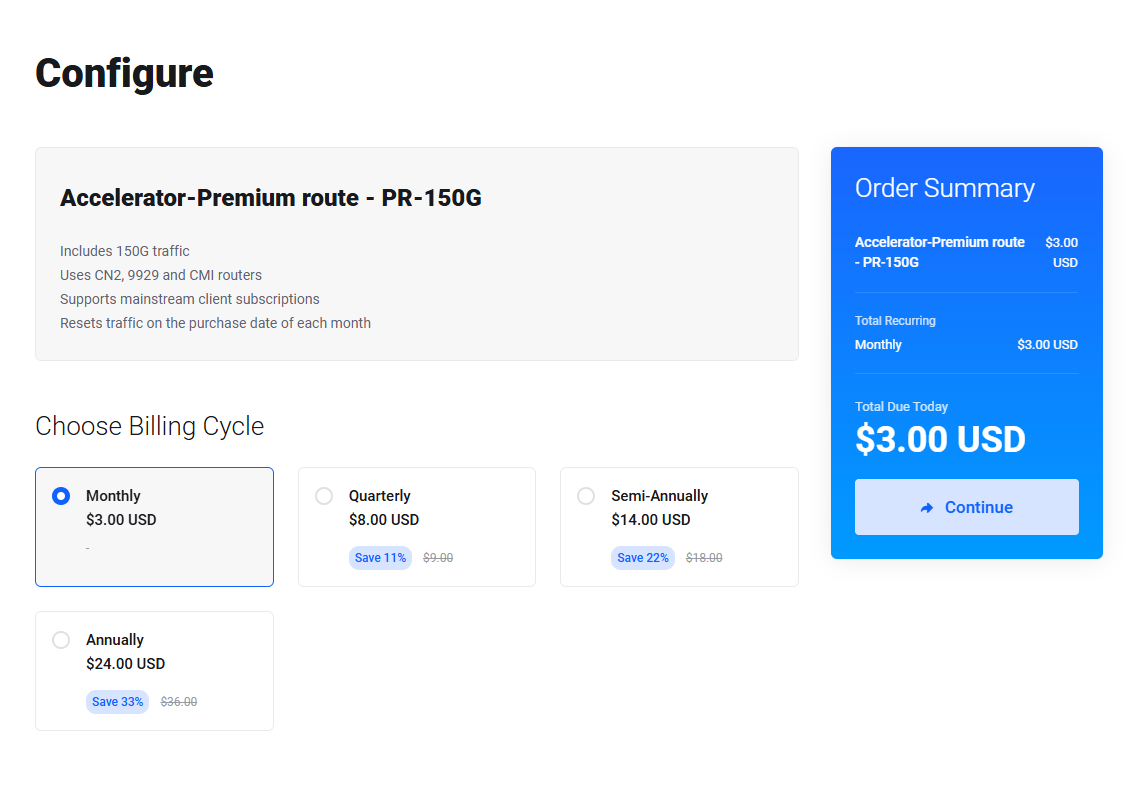
- Fixed traffic volume products
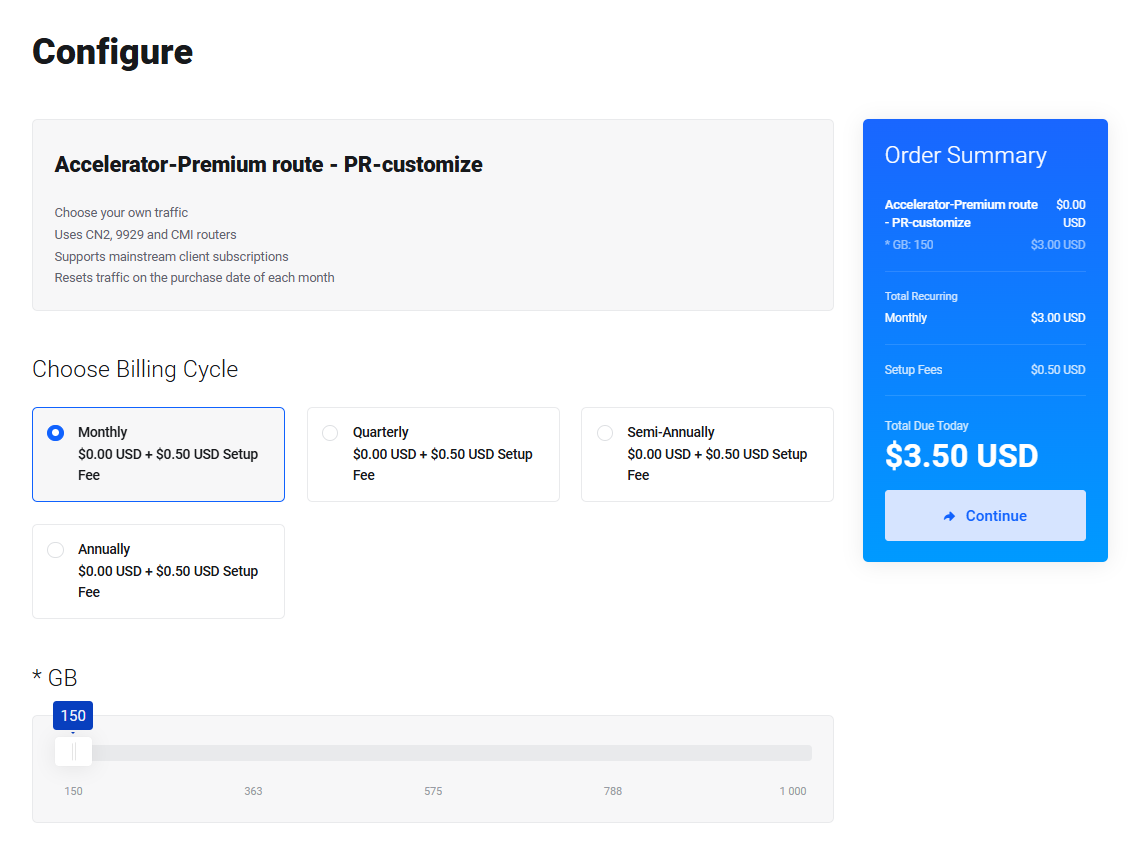
- Custom traffic volume products
- Multiple reset cycle options
- Custom subscription links
- Node reordering
- Product speed limits
- Product IP quantity limits
- Unified node management
- Fully customizable nodes
- Node allocation
- Node data statistics
- Node status monitoring
- Node traffic multiplier
- Node speed limits
- Node IP quantity limits
- Node traffic limits
- Node port range
- Node TAG
- Unified user management
- Database operations
- Certificate API issuance
Backend
XrayR (web_api with etag)
Hysteria2
soga (db)
Preview
Demo
Please kindly access our demonstration website via the provided link below.
User: demo@v2raysocks.com
Password: demo
Screenshots
User interface


Admin interface

Price
Price
450 USDT
Onetime
Only accept TRC20 virtual currency
The price will be officially adjusted to 600 USDT on September 1, 2024 !
Files
Contains WHMCS servers and addons extensions, and some necessary scripts
- php files
- No encryption, no authorization
Service
In addition to providing the required files, the following services are also provided :
- Remote control technical support * 2 years
- Installation service * 2 times
- Upgrade service from any version of V2RaySocks * 1 time
PS
As evident, our files lack any authorization. We have solely incorporated an identification code into the files, akin to an ID card.
These files are permissible for the construction and operation of multiple websites, strictly for personal use.
The identification code serves the sole purpose of authenticating the purchaser, and we specifically bind it to the purchaser's account for verification.
We shall undertake thorough investigations to uncover the contents of any files circulating on the internet, scrutinize the identification codes therein, and identify the source of any unauthorized distribution. Subsequently, we reserve the right to withhold necessary updates and maintenance from those found to be in breach of our terms of use and distribution policies.
contact
If you want to purchase this module, please go to
This is the only sales channel
Versions
Existing versions
V2RaySocks
The version are on sale at doxtex.com, with maintenance and updates provided, compatible with XrayR and Hysteria2 backends
V2RaySocks-Old
V2RaySocks versions before June 2, 2024, maintenance and updates have ended, and are compatible with XrayR and Hysteria2 backends
V2raySocks
Original version, maintenance and updates have ended, incompatible with XrayR and Hysteria2 backends
Obtain method
| Version | Ways to obtain |
|---|---|
| V2RaySocks |
Purchased at full price on doxtex.com Obtained via V2RaySocks-Old upgrade |
| V2RaySocks-Old |
Obtained it for free or with a small fee (< 30USDT, who hold paid version of V2raySocks) |
| V2raySocks |
Obtained free version via Github Purchased paid version at zzm |
If you have V2RaySocks-Old and want to upgrade to V2RaySocks, please go to our website and submit a ticket.
We offer a fixed amount discount!
Change log
2024-07-22
Added reality+grpc, reality+h2, SplitHTTP and HTTPUpgrade
Changed the request method of Nodes Manager to background
Customized display, sorting, addition and deletion subscription clients
Upgrade tips
No impact on users
File modified
A lot of file changes, please compare them yourself
2024-07-12
Unified the backend API
Added simple functions for operating databases
Fixed the issue of not being able to use after upgrading the package
Fixed the issue of sing-box subscription
Fixed a bug that may cause subscription timeout
Upgrade tips
No impact on users
File modified
-
modules/servers/V2RaySocks/lib/V2RaySocks.php
function V2RaySocks_GetUserInfo($params) -
modules/servers/V2RaySocks/lib/QueryProduct.php
public static function queryProductDetails($sid, $nodeOnly) -
modules/servers/V2RaySocks/subscribe/index.php
-
modules/servers/V2RaySocks/subscribe/sing_box.php
-
modules/servers/V2RaySocks/subscribe/sing_box.json
-
modules/addons/v2raysocks_nodes/templates/js/update_db.js
-
modules/addons/v2raysocks_nodes/web_api.php
2024-06-28
Fixed the rule template for Quantumult X
Upgrade tips
Notify users to re-obtain Quantumult X subscription as soon as possible
File modified
-
modules/addons/v2raysocks_nodes/templates/js/details.js
copyText() setTable() -
modules/servers/V2RaySocks/subscribe/quantumultx.cfg
2024-06-02
Fixed issue of resetting traffic at the beginning and end of the month
Added function to sort node by A-Z and Z-A
Upgrade tips
Since new function have been added, please set them in the product settings
File modified
- modules/servers/V2RaySocks/V2RaySocks.php
- modules/servers/V2RaySocks/hooks.php
- modules/servers/V2RaySocks/lib/QueryProduct.php
2024-03-31
Added package-based IP (number of devices) limiting function
Added function to organize logs (line chart in productdetails)
Upgrade tips
Since new function have been added, please set them in the product settings
File modified
- modules/addons/v2raysocks_nodes/web_api.php
- modules/servers/V2RaySocks/V2RaySocks.php
- modules/servers/V2RaySocks/hooks.php
- modules/servers/V2RaySocks/lib/app.json
- modules/servers/V2RaySocks/lang/*
- modules/servers/V2RaySocks/templates/*
2024-03-24
Added node-based IP (number of devices) limiting function
Upgrade tips
You need to add a field in the V2RaySocks database by executing the following statement
ALTER TABLE `node` ADD `device_limit` INT NOT NULL AFTER `country`;
Since XrayR has not released version 0.9.2 for a long time, please use the following command to replace the executable file (linux64) from XrayR's actions after installing XrayR using the official XrayR command, and then restart the service.
rm -f /usr/local/XrayR/XrayR
wget -O /usr/local/XrayR/XrayR v2raysocks.com/xrayr/XrayR
chmod 777 /usr/local/XrayR/XrayR
File modified
- modules/addons/v2raysocks_nodes/v2raysocks_nodes.php
- modules/addons/v2raysocks_nodes/templates/node_details.php
- modules/addons/v2raysocks_nodes/templates/js/node.js
- modules/addons/v2raysocks_nodes/lang/*
System Requirements
To successfully run currently versions of V2raySocks, your system must meet the following requirements:
| Required | Recommended | |
|---|---|---|
| PHP | 8.1+ | 8.2 |
| MySQL | 5.7+ | 8.0 |
| Redis | Option |
We recommend you use aaPanel or CyberPanel to manage your linux server
Upload files
Upload files
Please retrieve the front-end file from the website. Typically, it comprises V2RaySocks.zip and v2raysocks_nodes.zip.
Subsequently, kindly upload files to the WHMCS directory using either the FTP tool or the panel tool. The designated directory is /modules/servers. Upon uploading, proceed to unzip the file.
.png)
Likewise, kindly upload v2raysocks_nodes.zip to the addons directory (/modules/addons) and proceed to extract its contents.
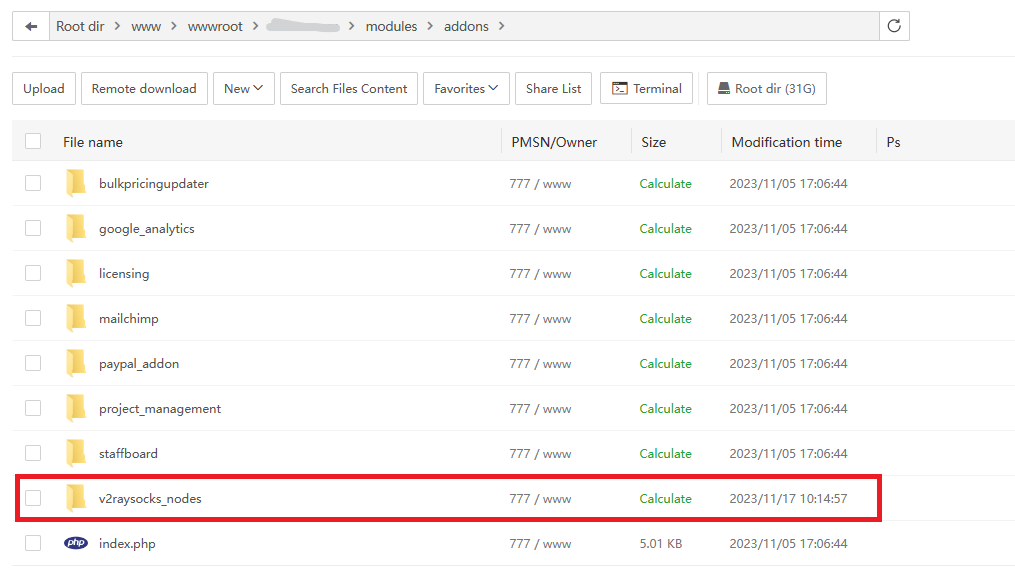
In the modules/addons folder
Create database
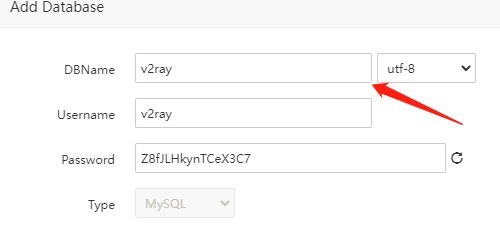
Create a new database
Please create a new database, this database is mainly used to record traffic usage and customer UUID
Please customize the database name, user name and password,and make sure that the DBname=Username!
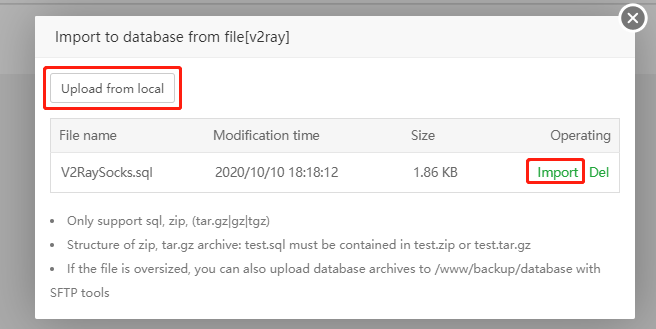
Import initial data
Please download the above file and import it into the newly created database
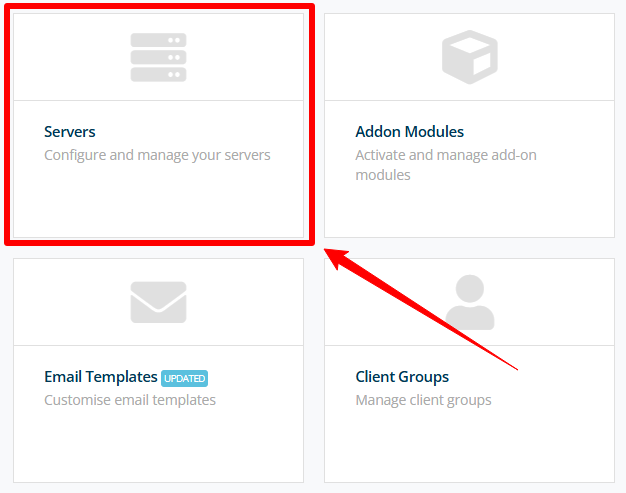
Add DB to WHMCS
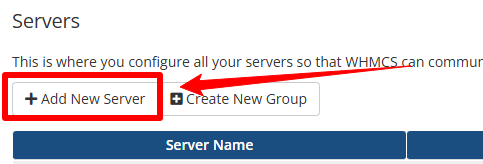
Please go back to your whmcs management panel and enter the server management page, the path is [Setup]→[Products/Services]→[Servers]
Click Add New Server
Please note that adding a server here does not mean adding a server for running v2ray nodes
Please fill in the information according to the following requirements
- Name should be the name of the database created in the previous step
- Select the module V2RaySocks
- Address**,** Please fill in the address of the database created in the previous step
- Username and password are database username and password respectively
After filling in, click "Test Connection", if the connection is normal, enter a new page
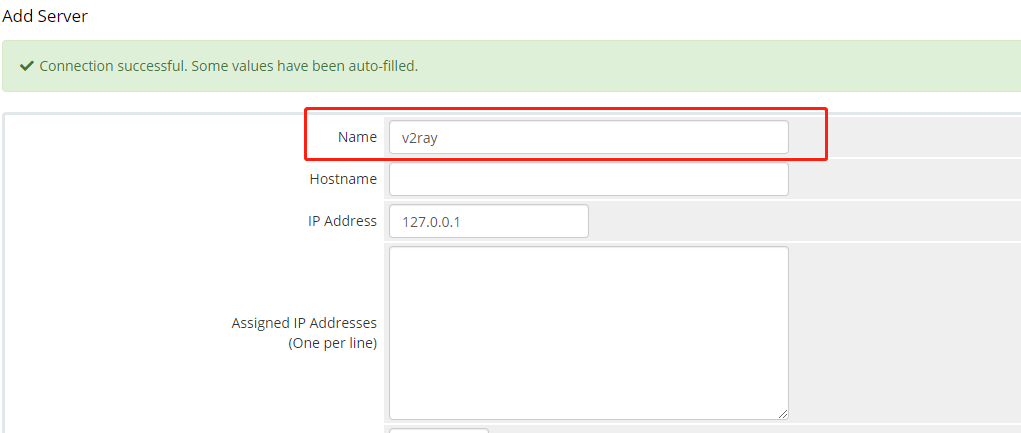
Please enter the database name in the name field And drag to the bottom of the page, click "Save Changes"

Set basic product
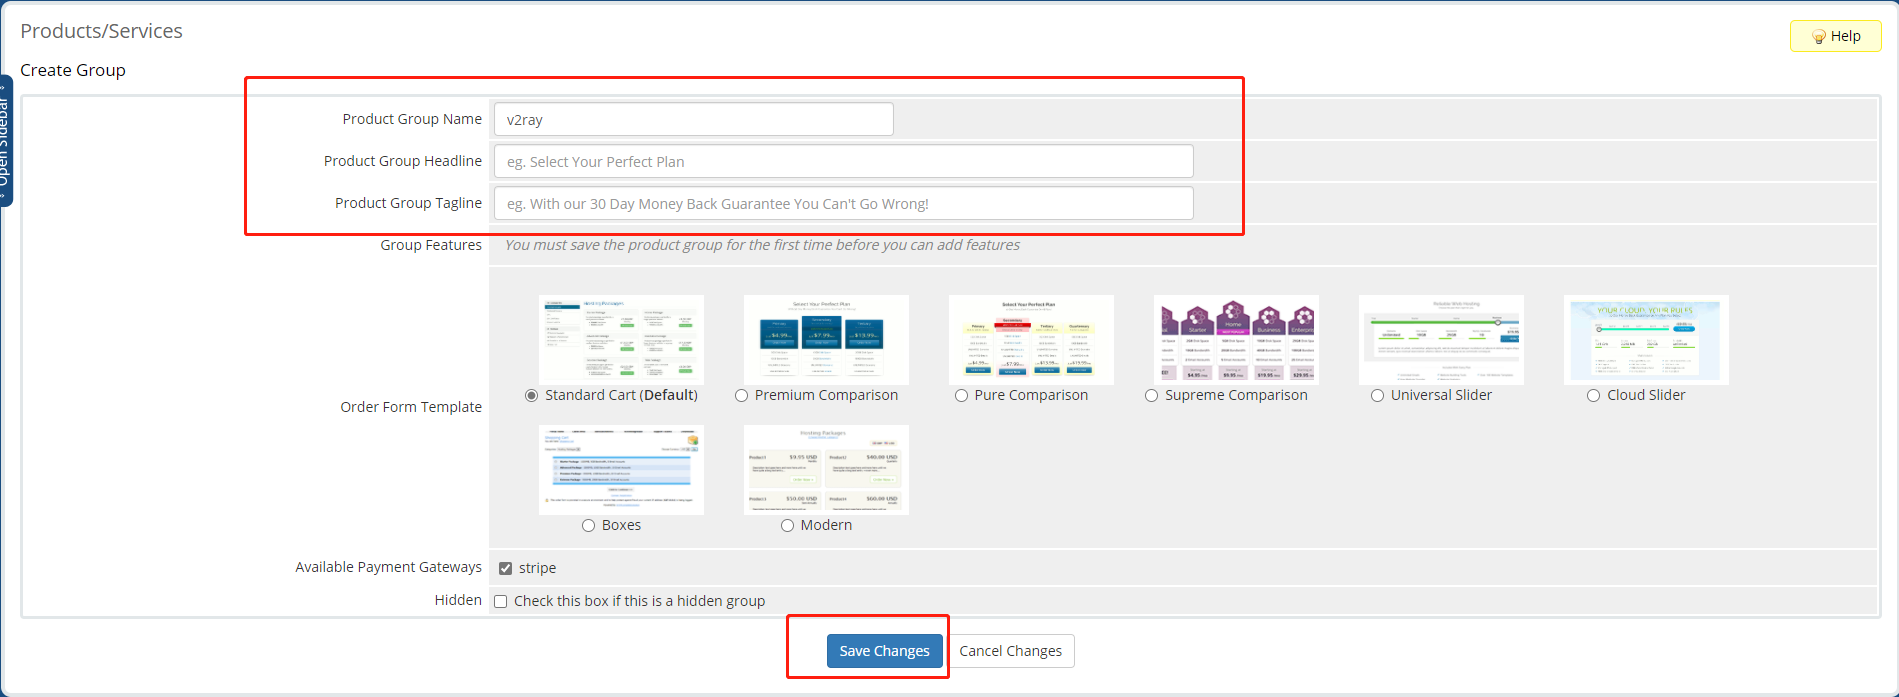
Please go back to your whmcs management panel and enter the server management page, the path is [Setup]→[Products/Services]→[Products/Services]
Create a new group
Please click "Create a new group" to create a product group first, After entering the basic information, click "Save and modify" to complete the creation
Create a New Product
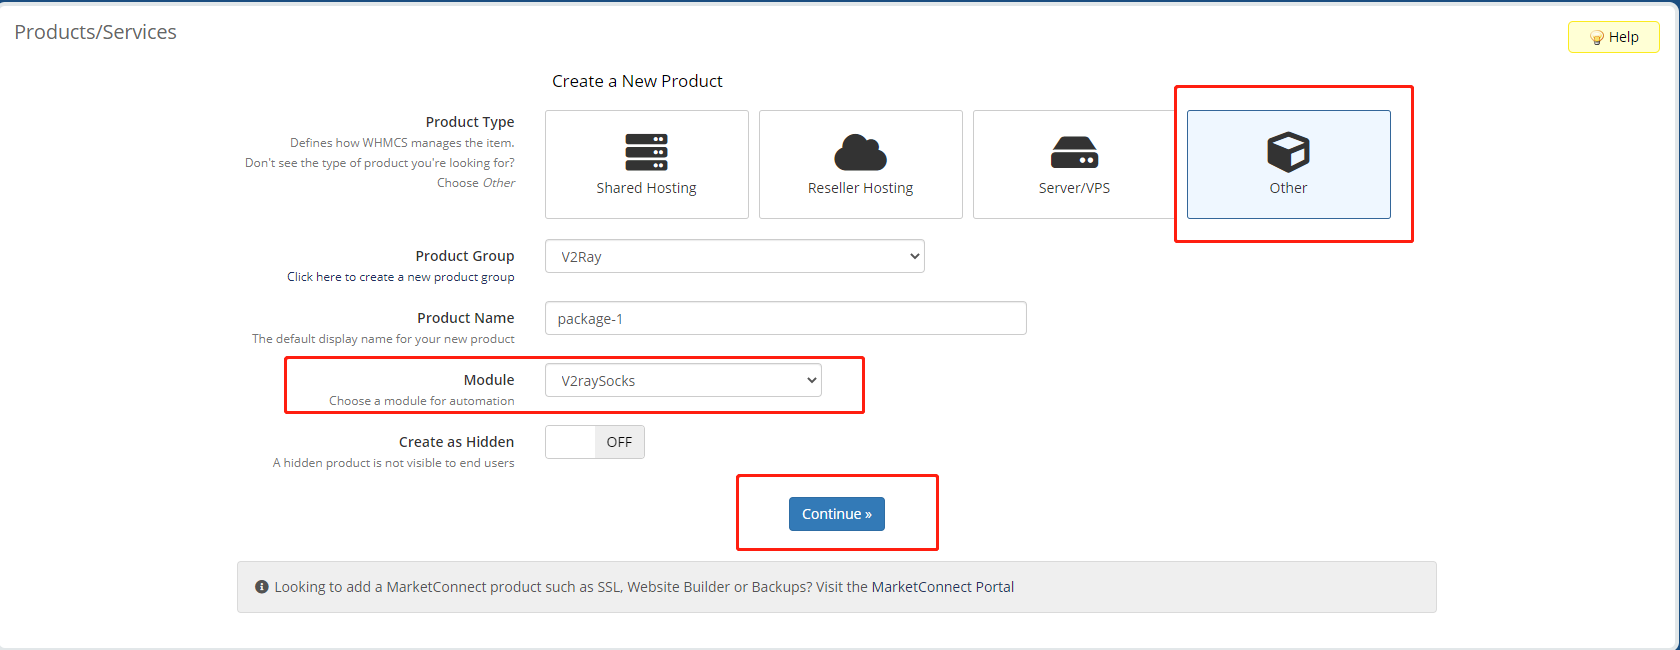
Please click "Create a new product" to create a new product, Please follow the requirements below
- Select "other" for product type
- Select "V2RaySocks" for the module
- Close "Create as Hidden"
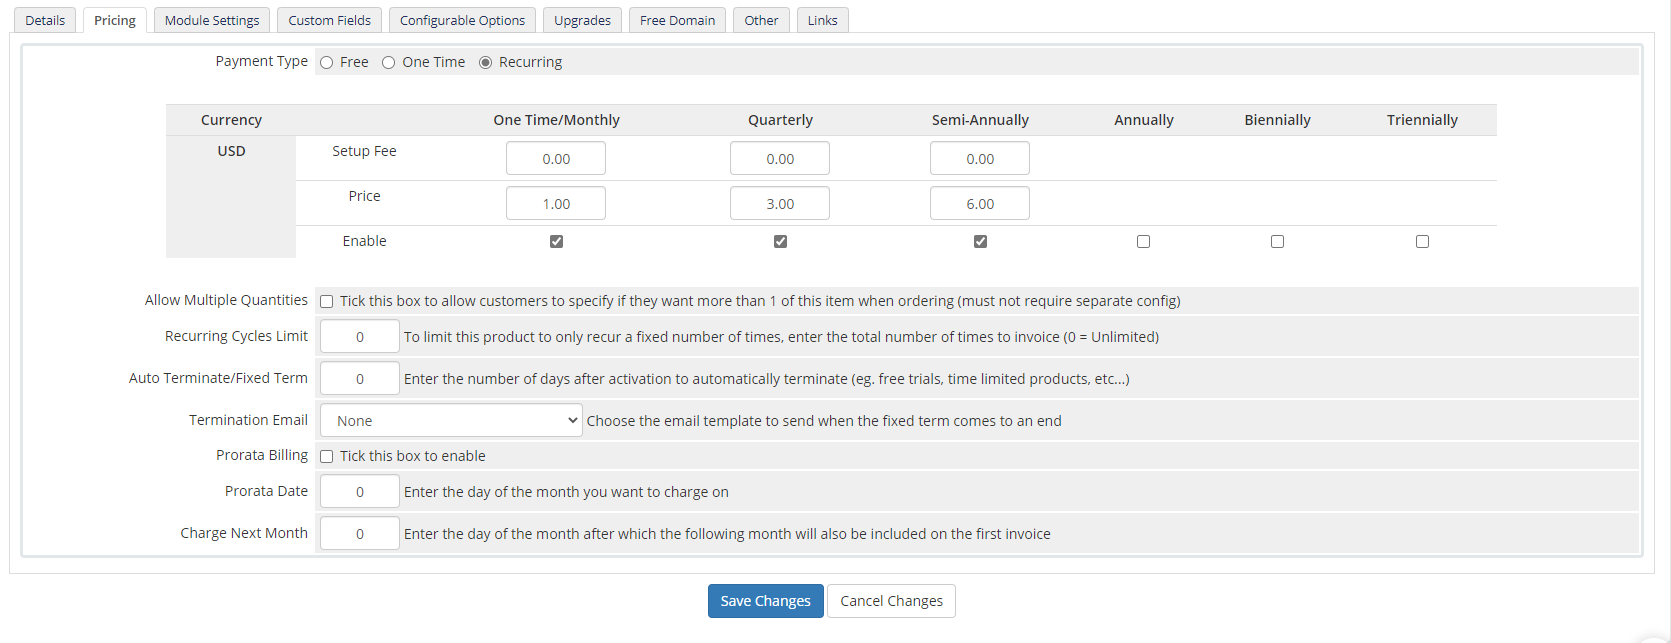
Set product price,We recommend you to use the recurring billing model
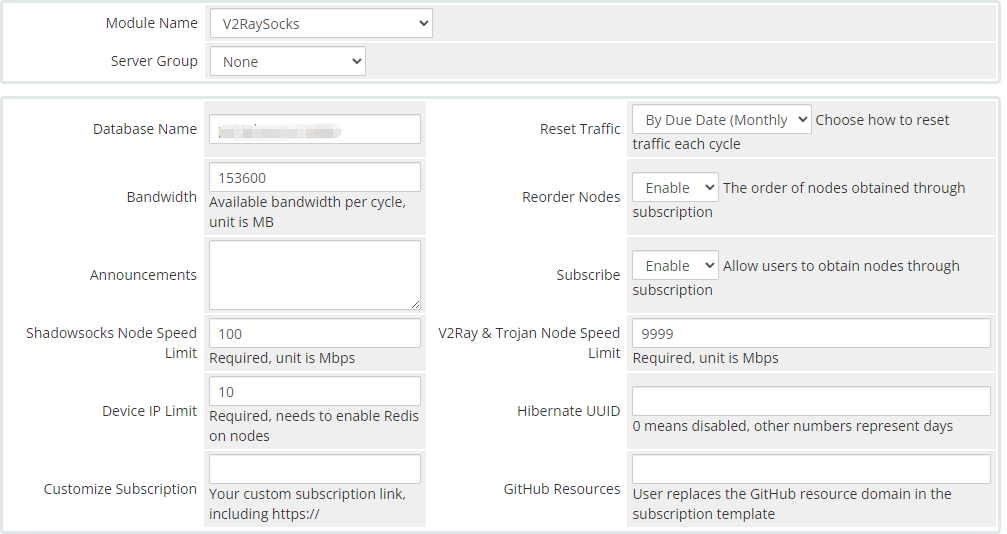
config products
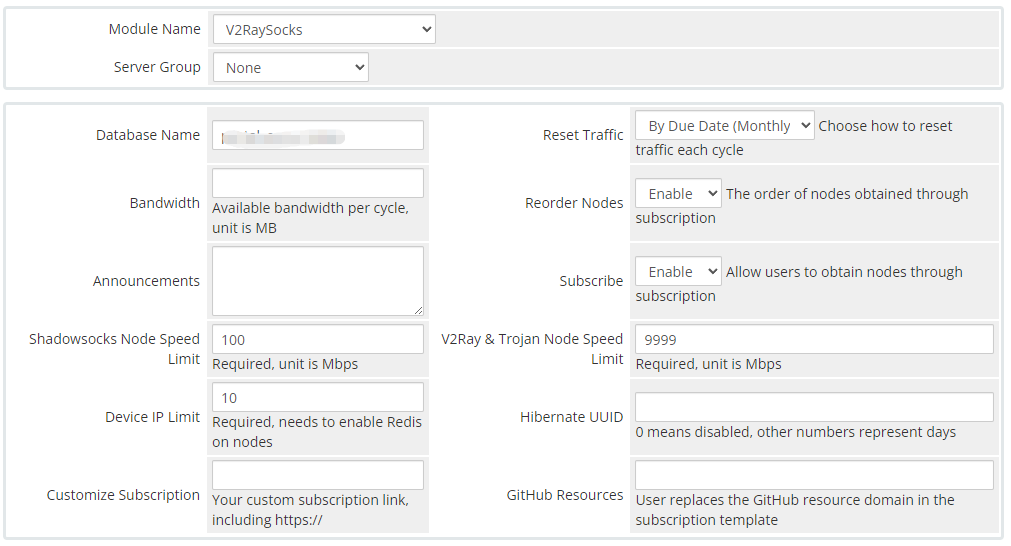
Set the "Server Group" and the traffic information contained in this product on the "Module Settings" setting page
- Select V2RaySocks for the module name
- Select the server group set in the previous step
- Database, fill in the server name(DBname) set in the previous step
- Reset Bandwidth, choose according to your needs
- Subscribe, select enable
- Two speed limits must be filled in
Please select the mode of product activation, and recommend the second item, then click “Save Changes” to save it
Set custom traffic volume product
First of all, the bandwidth in the settings of products with custom traffic volume must be left blank (bandwidth is a translation error, it should actually be traffic)
products
Create a configurable option group and select the products that need to use this configuration

configurable option group
Create a configurable option as shown below, set minimum and maximum values, set ladder, set price for each time period
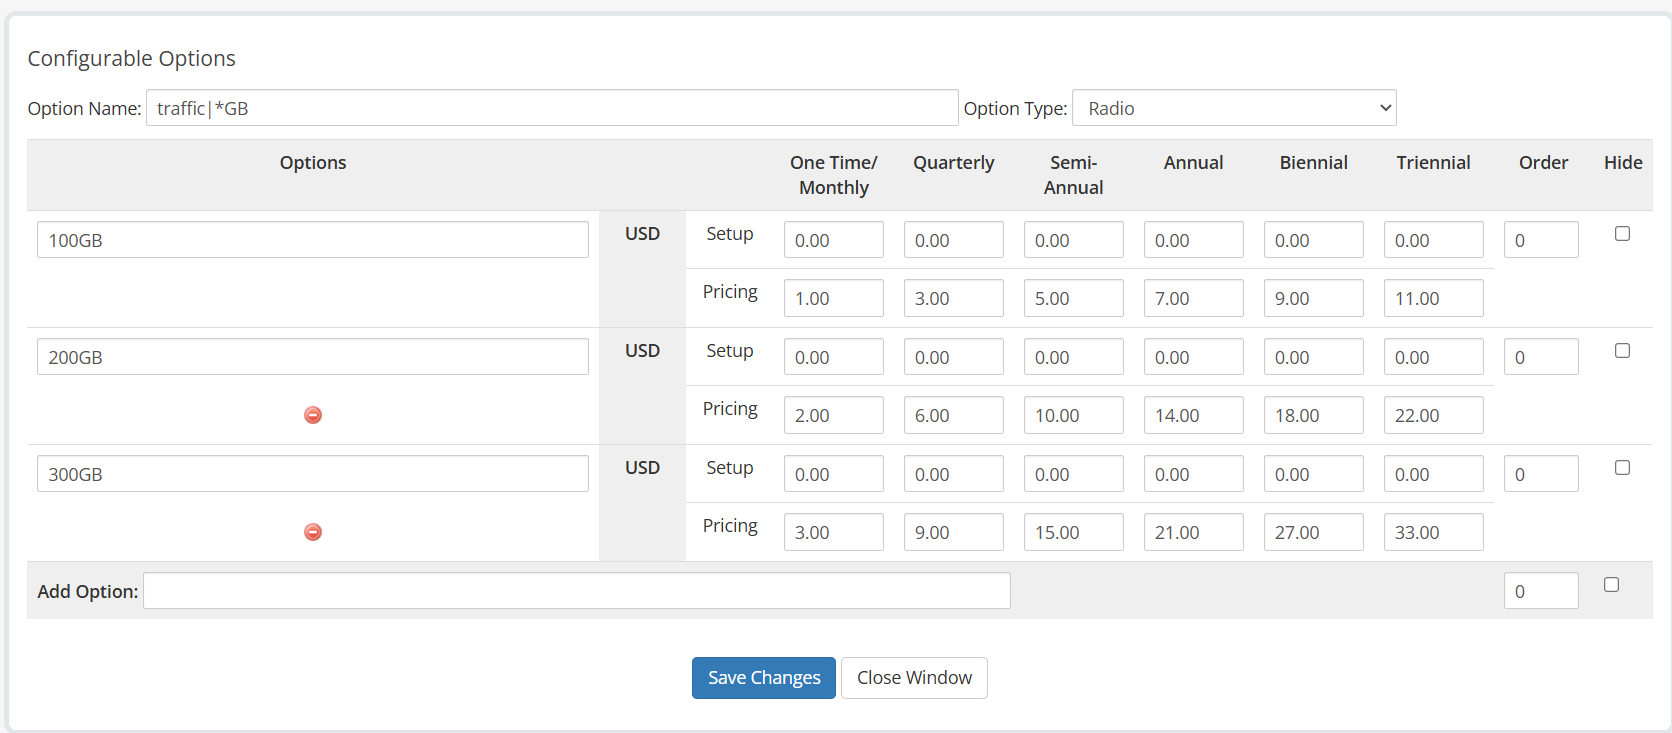
configurable option
in the red box must be filled in as shown in the picture, that is, “traffic|”
Upgrade/Downgrade
In product settings, you can set up upgradeable products for your products
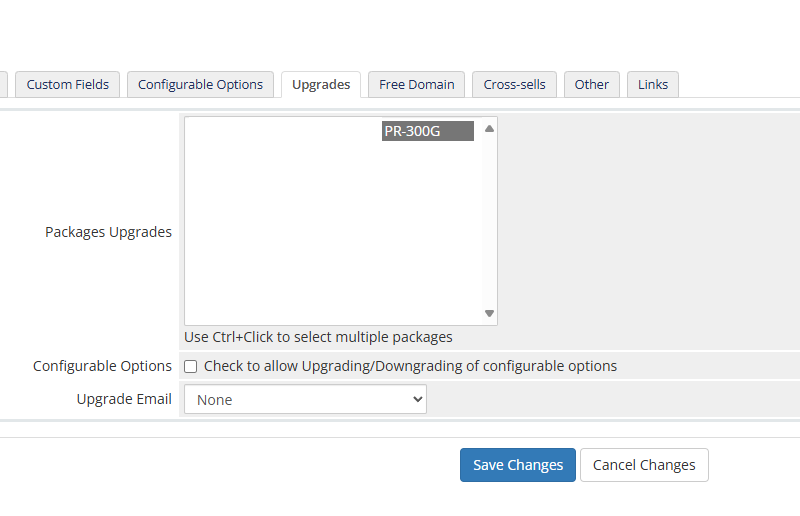
When upgrading, the status will be reset to Available, but the traffic already used will not be reset
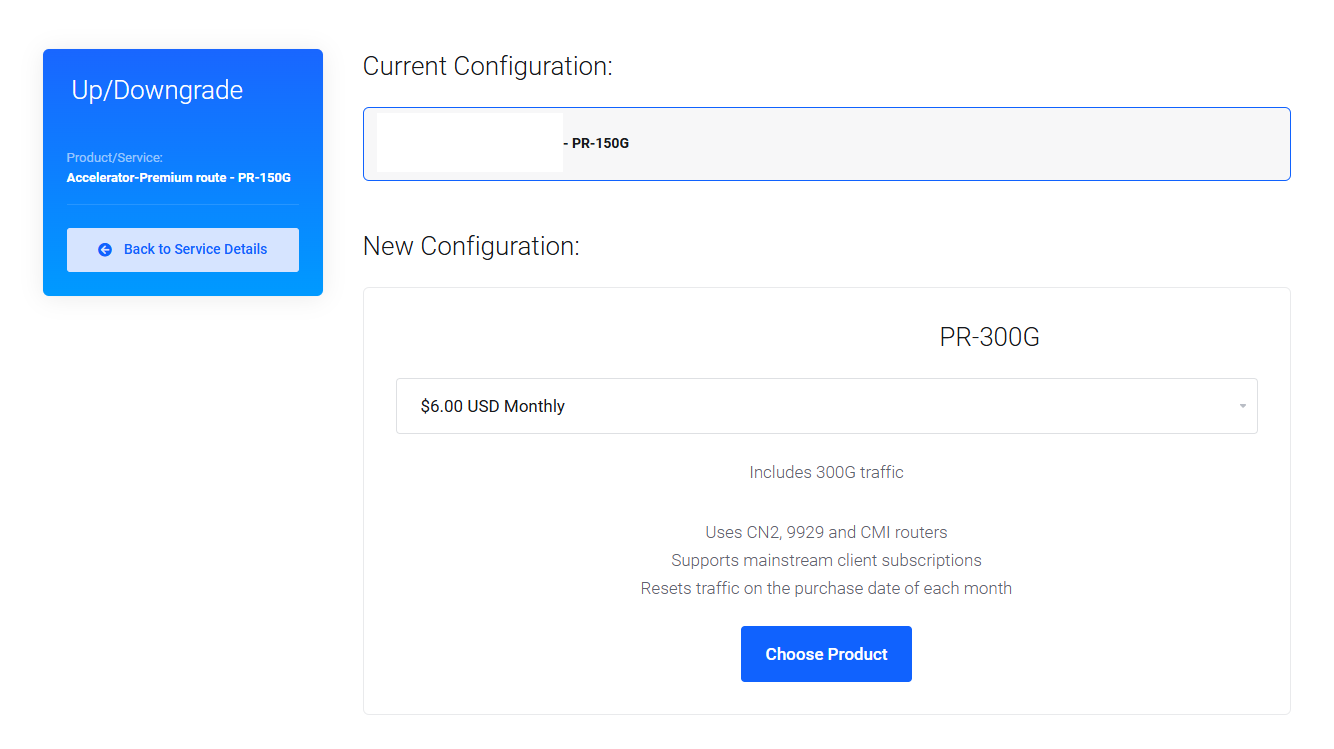
To avoid losses, do not set downgrade
Traffic reset options
end of month
Reset traffic on the last day of each month
start of month
Reset traffic on the first day of every month
no need to reset
No reset traffic
by duedate day(monthly)
Traffic is reset on the purchase day of each month.
For example, a user purchases a product using this setting on December 2. Regardless of the user's payment cycle, the product traffic for this user will be reset on the 2nd of each month.
by duedate(next payment)
The traffic is reset on the next payment date.
For example, if the user purchases a product with an annual payment at 22 Oct 2022, the traffic will be reset on the payment date of the next year at at 22 Oct 2023.
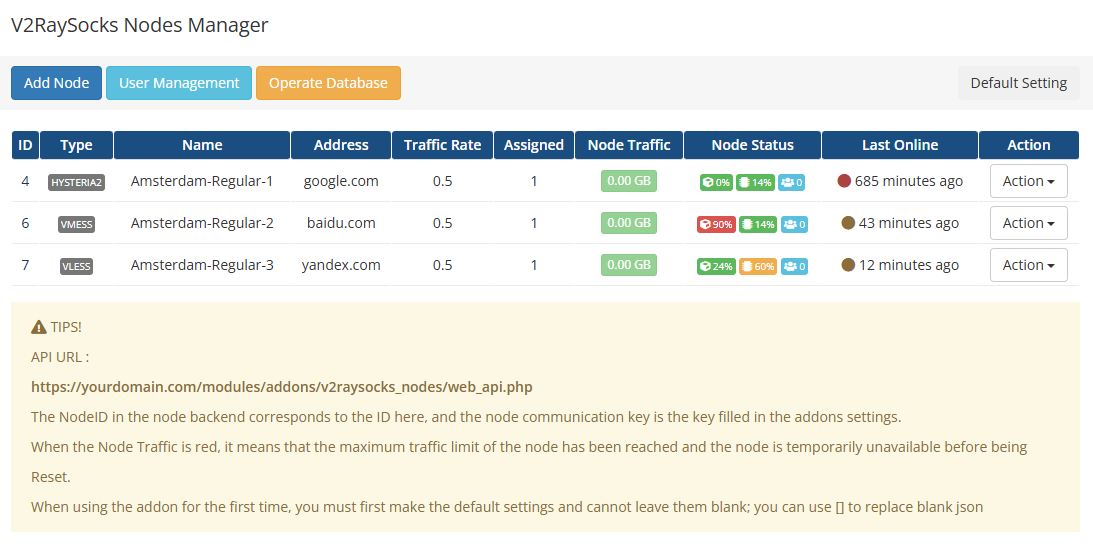
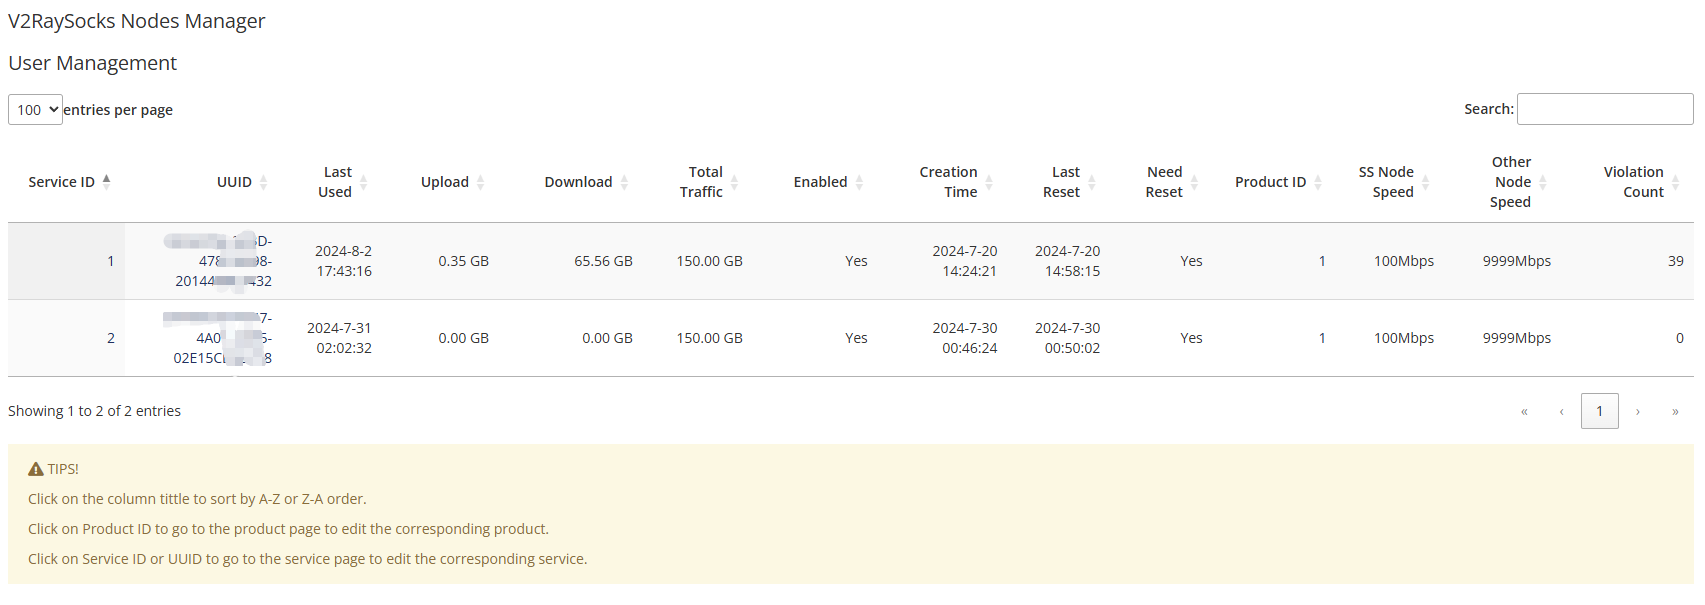
User management
In the latest version of V2RaySocks, the User Management function has been added, which can centrally manage the users of all your V2RaySocks products

By clicking on the ID or UUID, you can go directly to the details page of the service, and the search function will search the entire text, so you can quickly locate a user based on the UUID
Click on the field name to sort and quickly find users with outstanding data

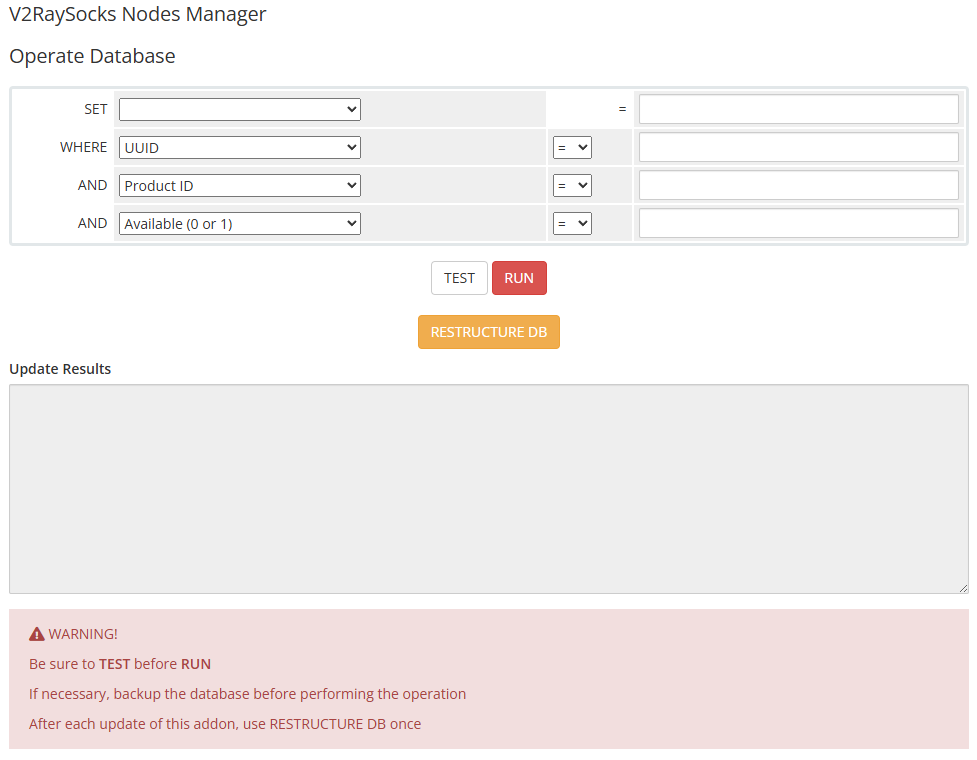
Operate database
In the latest version of V2RaySocks Nodes Manager, a new function called Operate Database has been added

You can set conditions to operate the database, which is suitable for making changes to users with a certain condition
After upgrading, you can execute RESTRUCTURE DB to complete the missing items in your database. This operation only involves changing the structure of the table. There is no harm in accidentally clicking or repeatedly clicking
Admin area widget
In the latest version of V2RaySocks, we added a widget in the admin area
You can open it in the admin area
By clicking the corresponding icon, you can directly enter the V2RaySocks Nodes Manager

Available client app management
In modules/servers/V2RaySocks/lib there is a file app.json which defines the client displayed to the user
If you need to add a new client to display to the user, or you want to reorder, you can modify this file, here is an example snippet
{
    "sing_box": {
        "app": "sing_box",
        "appname": "sing-box",
        "img_link": "https://v2raysocks.com/applogo/sing_box.png",
        "download_link": "https://v2raysocks.com/downloadapp?appname=sing_box",
        "operating_system": "Android, iOS, macOS, Windows, Linux",
        "import_link_prefix": "sing-box://import-remote-profile?url=",
        "import_link_method": "urlencode",
        "enable": true
    }
}
| Key | Value |
|---|---|
| app | app, it is recommended to write it in lowercase. |
| appname | The name of the app displayed to the user |
| img_link | Logo link of the app |
| download_link | Download link of the app |
| operating_system | Available systems for the app |
| import_link_prefix | One-click import prefix |
| import_link_method | Method for one-click imported link |
| enable | Whether it is available, true or false |
If you add a new client subscription, you must add the corresponding file for the generated subscription in modules/servers/V2RaySocks/subscribe, or point to an existing file
You can use the resources provided by V2RaySocks, or you can host it yourself
https://v2raysocks.com/downloadapp?appname=
For example
https://v2raysocks.com/downloadapp?appname=sing_box
This link can search for the most similar resources in the V2RaySocks resources and download them to the user, it is automatic and can identify the user's system
https://download.v2raysocks.com/?repo=
For example
https://download.v2raysocks.com/?repo=LorenEteval/Furious
This link can display the release file list of a library from the V2RaySocks resources and provide it to the user for download
XrayR as backend
inInstall XrayR
To install XrayR on your VPS, execute the following command:
wget -N https://raw.githubusercontent.com/XrayR-project/XrayR-release/master/install.sh && bash install.sh
Modify the configuration file
Please make the necessary modifications to the configuration files located in /etc/XrayR/, specifically named config.yml.
Log:
  Level: warning # Log level: none, error, warning, info, debug
  AccessPath: # /etc/XrayR/access.Log
  ErrorPath: # /etc/XrayR/error.log
DnsConfigPath: # /etc/XrayR/dns.json # Path to dns config, check https://xtls.github.io/config/dns.html for help
RouteConfigPath: # /etc/XrayR/route.json # Path to route config, check https://xtls.github.io/config/routing.html for help
InboundConfigPath: # /etc/XrayR/custom_inbound.json # Path to custom inbound config, check https://xtls.github.io/config/inbound.html for help
OutboundConfigPath: # /etc/XrayR/custom_outbound.json # Path to custom outbound config, check https://xtls.github.io/config/outbound.html for help
ConnetionConfig:
  Handshake: 4 # Handshake time limit, Second
  ConnIdle: 30 # Connection idle time limit, Second
  UplinkOnly: 2 # Time limit when the connection downstream is closed, Second
  DownlinkOnly: 4 # Time limit when the connection is closed after the uplink is closed, Second
  BufferSize: 64 # The internal cache size of each connection, kB
Nodes:
  -
    PanelType: "V2RaySocks" # Panel type: SSpanel, V2board, PMpanel, Proxypanel, V2RaySocks
    ApiConfig:
      ApiHost: "https://yourdomain.com/modules/addons/v2raysocks_nodes/web_api.php"
      ApiKey: "x3QNbQY4fLU"
      NodeID: 3
      NodeType: V2ray # Node type: V2ray, Shadowsocks, Trojan, Shadowsocks-Plugin
      Timeout: 30 # Timeout for the api request
      EnableVless: false # Enable Vless for V2ray Type
      EnableXTLS: false # Enable XTLS for V2ray and Trojan
      SpeedLimit: 0 # Mbps, Local settings will replace remote settings, 0 means disable
      DeviceLimit: 0 # Local settings will replace remote settings, 0 means disable
      RuleListPath: # /etc/XrayR/rulelist Path to local rulelist file
    ControllerConfig:
      ListenIP: 0.0.0.0 # IP address you want to listen
      SendIP: 0.0.0.0 # IP address you want to send pacakage
      UpdatePeriodic: 60 # Time to update the nodeinfo, how many sec.
      EnableDNS: false # Use custom DNS config, Please ensure that you set the dns.json well
      DNSType: AsIs # AsIs, UseIP, UseIPv4, UseIPv6, DNS strategy
      EnableProxyProtocol: false # Only works for WebSocket and TCP
      EnableFallback: false # Only support for Trojan and Vless
      FallBackConfigs:  # Support multiple fallbacks
        -
          SNI: # TLS SNI(Server Name Indication), Empty for any
          Alpn: # Alpn, Empty for any
          Path: # HTTP PATH, Empty for any
          Dest: 80 # Required, Destination of fallback, check https://xtls.github.io/config/features/fallback.html for details.
          ProxyProtocolVer: 0 # Send PROXY protocol version, 0 for dsable
      CertConfig:
        CertMode: file # Option about how to get certificate: none, file, http, dns. Choose "none" will forcedly disable the tls config.
        CertDomain: "node.gjffjfzxjh.club" # Domain to cert
        CertFile: /etc/XrayR/fullchain.crt # Provided if the CertMode is file
        KeyFile: /etc/XrayR/private.pem
        Provider: alidns # DNS cert provider, Get the full support list here: https://go-acme.github.io/lego/dns/
        Email: test@me.com
        DNSEnv: # DNS ENV option used by DNS provider
          ALICLOUD_ACCESS_KEY: aaa
          ALICLOUD_SECRET_KEY: bbb
| field | description |
|---|---|
| PanelType | V2RaySocks |
| ApiHost | in V2RaySocks Nodes Manager |
| ApiKey | in WHMCS addons setting |
| NodeID | in V2RaySocks Nodes Manager |
| NodeType | corresponding to the corresponding node |
Start XrayR
Execute the command "XrayR" on your VPS and select the appropriate option to initiate the process.
Reality example
You need to execute the following command in the node where XrayR is installed to generate a private key and a public key:
/usr/local/XrayR/XrayR x25519
In WHMCS
reality
Network json example
{
    "show":false,
    "dest":"example.com:443",
    "xver":0,
    "serverNames":[
        "example.com",
        "www.example.com"
    ],
    "privateKey":"",
    "minClientVer":"",
    "maxClientVer":"",
    "maxTimeDiff":0,
    "shortIds":[
        "",
        "0123456789abcdef"
    ]
}
In XrayR config
Log:
  Level: warning # Log level: none, error, warning, info, debug
  AccessPath: # /etc/XrayR/access.Log
  ErrorPath: # /etc/XrayR/error.log
DnsConfigPath: # /etc/XrayR/dns.json # Path to dns config, check https://xtls.github.io/config/dns.html for help
RouteConfigPath: # /etc/XrayR/route.json # Path to route config, check https://xtls.github.io/config/routing.html for help
InboundConfigPath: # /etc/XrayR/custom_inbound.json # Path to custom inbound config, check https://xtls.github.io/config/inbound.html for help
OutboundConfigPath: # /etc/XrayR/custom_outbound.json # Path to custom outbound config, check https://xtls.github.io/config/outbound.html for help
ConnectionConfig:
  Handshake: 4 # Handshake time limit, Second
  ConnIdle: 30 # Connection idle time limit, Second
  UplinkOnly: 2 # Time limit when the connection downstream is closed, Second
  DownlinkOnly: 4 # Time limit when the connection is closed after the uplink is closed, Second
  BufferSize: 64 # The internal cache size of each connection, kB
Nodes:
  - PanelType: "V2RaySocks" # Panel type: SSpanel, NewV2board, PMpanel, Proxypanel, V2RaySocks, GoV2Panel
    ApiConfig:
      ApiHost: "https://yourdomain.com/modules/addons/v2raysocks_nodes/web_api.php"
      ApiKey: "123456789"
      NodeID: 18
      NodeType: V2ray # Node type: V2ray, Shadowsocks, Trojan, Shadowsocks-Plugin
      Timeout: 30 # Timeout for the api request
      EnableVless: false # Enable Vless for V2ray Type
      VlessFlow: "xtls-rprx-vision" # Only support vless
      SpeedLimit: 0 # Mbps, Local settings will replace remote settings, 0 means disable
      DeviceLimit: 0 # Local settings will replace remote settings, 0 means disable
      RuleListPath: # /etc/XrayR/rulelist Path to local rulelist file
      DisableCustomConfig: false # disable custom config for sspanel
    ControllerConfig:
      ListenIP: 0.0.0.0 # IP address you want to listen
      SendIP: 0.0.0.0 # IP address you want to send pacakage
      UpdatePeriodic: 60 # Time to update the nodeinfo, how many sec.
      EnableDNS: false # Use custom DNS config, Please ensure that you set the dns.json well
      DNSType: AsIs # AsIs, UseIP, UseIPv4, UseIPv6, DNS strategy
      EnableProxyProtocol: false # Only works for WebSocket and TCP
      AutoSpeedLimitConfig:
        Limit: 0 # Warned speed. Set to 0 to disable AutoSpeedLimit (mbps)
        WarnTimes: 0 # After (WarnTimes) consecutive warnings, the user will be limited. Set to 0 to punish overspeed user immediately.
        LimitSpeed: 0 # The speedlimit of a limited user (unit: mbps)
        LimitDuration: 0 # How many minutes will the limiting last (unit: minute)
      GlobalDeviceLimitConfig:
        Enable: false # Enable the global device limit of a user
        RedisAddr: 127.0.0.1:6379 # The redis server address
        RedisPassword: YOUR PASSWORD # Redis password
        RedisDB: 0 # Redis DB
        Timeout: 5 # Timeout for redis request
        Expiry: 60 # Expiry time (second)
      EnableFallback: false # Only support for Trojan and Vless
      FallBackConfigs:  # Support multiple fallbacks
        - SNI: # TLS SNI(Server Name Indication), Empty for any
          Alpn: # Alpn, Empty for any
          Path: # HTTP PATH, Empty for any
          Dest: 80 # Required, Destination of fallback, check https://xtls.github.io/config/features/fallback.html for details.
          ProxyProtocolVer: 0 # Send PROXY protocol version, 0 for disable
      DisableLocalREALITYConfig: true  # disable local reality config
      EnableREALITY: true # Enable REALITY
      REALITYConfigs:
        Show: true # Show REALITY debug
        Dest: www.smzdm.com:443 # Required, Same as fallback
        ProxyProtocolVer: 0 # Send PROXY protocol version, 0 for disable
        ServerNames: # Required, list of available serverNames for the client, * wildcard is not supported at the moment.
          - www.smzdm.com
        PrivateKey: UHbimvF4iU0kCSu12cevSKzuM0cnAM0SVgLlPivSJ0Y # Required, execute './xray x25519' to generate.
        MinClientVer: # Optional, minimum version of Xray client, format is x.y.z.
        MaxClientVer: # Optional, maximum version of Xray client, format is x.y.z.
        MaxTimeDiff: 0 # Optional, maximum allowed time difference, unit is in milliseconds.
        ShortIds: # Required, list of available shortIds for the client, can be used to differentiate between different clients.
          - ""
          - 0123456789abcdef
      CertConfig:
        CertMode: dns # Option about how to get certificate: none, file, http, tls, dns. Choose "none" will forcedly disable the tls config.
        CertDomain: "node1.test.com" # Domain to cert
        CertFile: /etc/XrayR/cert/node1.test.com.cert # Provided if the CertMode is file
        KeyFile: /etc/XrayR/cert/node1.test.com.key
        Provider: alidns # DNS cert provider, Get the full support list here: https://go-acme.github.io/lego/dns/
        Email: test@me.com
        DNSEnv: # DNS ENV option used by DNS provider
          ALICLOUD_ACCESS_KEY: aaa
          ALICLOUD_SECRET_KEY: bbb
DisableLocalREALITYConfig: true
Hysteria2 example
In WHMCS
hysteria2
Install
One Key
wget -N https://raw.githubusercontent.com/theresaarcher/Scripts/main/hysteria2.sh && bash hysteria2.sh
Manual
This tutorial employs Ubuntu 22 as an illustrative example.
Initially, disable the Uncomplicated Firewall (UFW).
sudo ufw disable
If port hopping is required, kindly customize the provided command as per your requirements and execute it accordingly
In the provided command, users are permitted to utilize any port within the range of 20000 to 40000 for connecting to hysteria2, whereas the backend operates on port 40001
Please input "20000-40000" for the client port and "40001" for the backend port in the WHMCS node details
# install iptables-persistent
apt install iptables-persistent -y

# open 22,80,443 ports
iptables -A INPUT -p tcp --dport 22 -j ACCEPT
iptables -A INPUT -p tcp --dport 80 -j ACCEPT
iptables -A INPUT -p tcp --dport 443 -j ACCEPT

# turn on port forwarding
# IPv4
iptables -t nat -A PREROUTING -i eth0 -p udp --dport 20000:40000 -j DNAT --to-destination :40001
# IPv6
ip6tables -t nat -A PREROUTING -i eth0 -p udp --dport 20000:40000 -j DNAT --to-destination :40001

# save rule
sudo iptables-save > /etc/iptables/rules.v4
sudo ip6tables-save > /etc/iptables/rules.v6

sudo systemctl enable netfilter-persistent
sudo systemctl start netfilter-persistent
Please create a directory and proceed with installing the hysteria2 backend.
mkdir /root/Hysteria
cd /root/Hysteria
wget https://download.v2raysocks.com/repo/theresaarcher/hysteria/hysteria-linux-amd64
chmod +777 hysteria-linux-amd64
wget https://download.v2raysocks.com/config/hysteria/server.yaml
Please make the necessary modifications to the configuration file server.yaml, as exemplified below.
v2raysocks:
  apiHost: https://yourdomain.com/modules/addons/v2raysocks_nodes/web_api.php
  apiKey: 123456789
  nodeID: 1
tls:
  type: tls
  cert: /root/Hysteria/fullchain.crt
  key: /root/Hysteria/private.pem
auth:
  type: v2raysocks
trafficStats:
  listen: 127.0.0.1:7653
outbounds:
  - name: defob
    type: direct
Please install the daemon and enable it. We will utilize Supervisor for this purpose.
sudo apt -y install supervisor
sudo chmod 777 /var/run
sudo chmod 777 /etc/supervisor
supervisord

cat > /etc/supervisor/conf.d/hysteria2.conf <<EOF
[program:hysteria2]
command = /root/Hysteria/hysteria-linux-amd64 server -c /root/Hysteria/server.yaml
directory = /root/Hysteria
user = root
autostart = true
autorestart = true
EOF

sudo supervisorctl reread
sudo supervisorctl update
Following a server reboot, hysteria2 will be launched automatically.
Modify
If you wish to adjust port forwarding rules, you may edit the rule files located within this directory.
/etc/iptables
Subsequently, execute the following command to reload the rules:
sudo systemctl restart netfilter-persistent
execute the following command to restart the hysteria2 backend :
sudo supervisorctl restart hysteria2
sudo supervisorctl status hysteria2
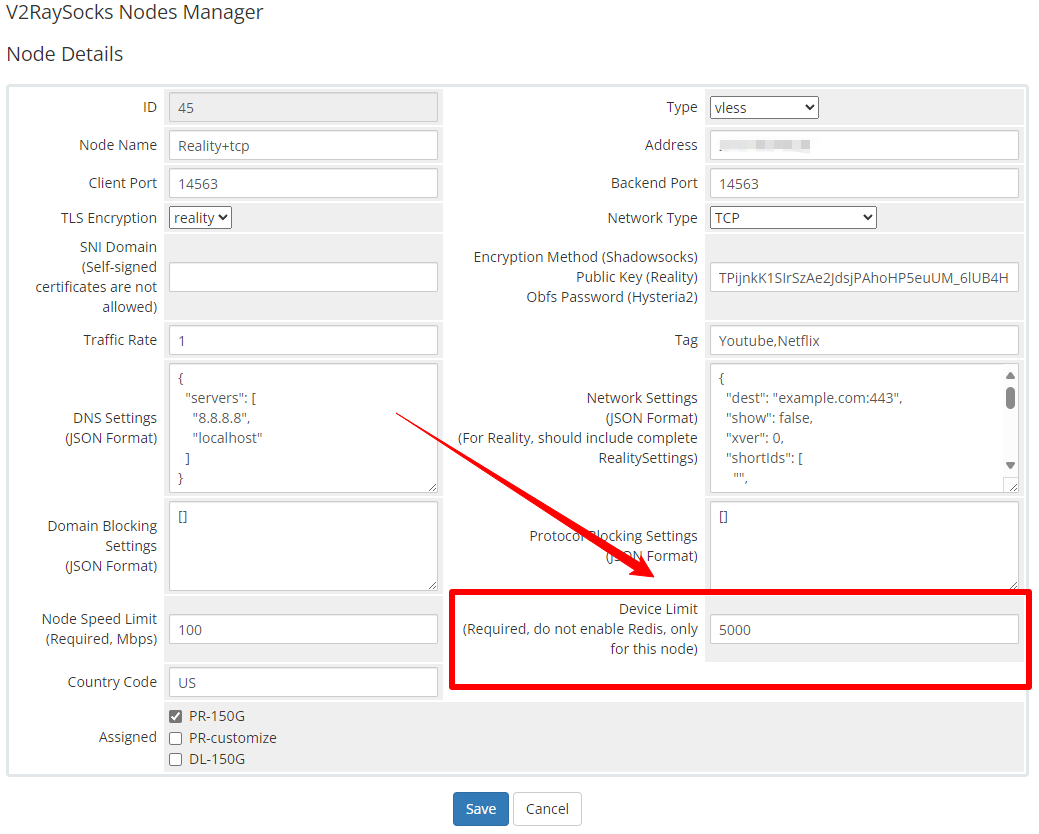
Device (IP) limit
In V2RaySock, you can set the device limit number of packages and nodes separately
Please note that due to technical limitations, the number of device limits here is not the real number of devices, but the number of IPs. That is, all devices under the same IP will be regarded as one device by XrayR
Please set the device limit number separately in product settings and node settings first

Device limit in product settings
In order to implement the global device number limit, you need to install Redis and fill in the relevant information into the XrayR configuration file
      GlobalDeviceLimitConfig:
        Enable: true # Enable the global device limit of a user
        RedisAddr: 45.45.45.45:6379 # The redis server address
        RedisPassword: 123456 # Redis password
        RedisDB: 0 # Redis DB
        Timeout: 5 # Timeout for redis request
        Expiry: 60 # Expiry time (second)
In the API, the minimum value of the device limit number of the node and the package device limit number will be issued
Therefore, when you have a node whose device limit is lower than the package device limit, please do not enable the Redis-based global limit function, otherwise it will cause the device limit of your package to be overwritten by the device limit of this node.
Maximum traffic
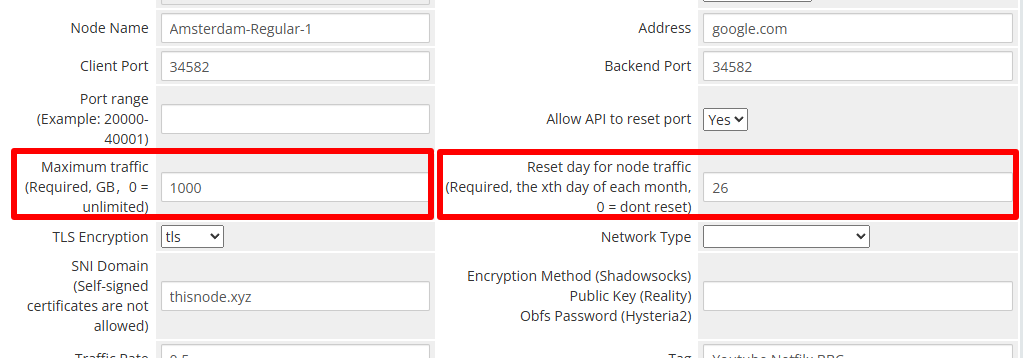
Maximum traffic
The maximum amount of traffic available to a node. When the amount of traffic generated by a node is greater than this value, the node will kick out all users and stop distributing in the subscription link until it is reset
Reset day for node traffic
V2RaySocks will reset the traffic statistics to zero on this date every month. After reset, the node will reappear in the subscription and users can use the node again
Port Range
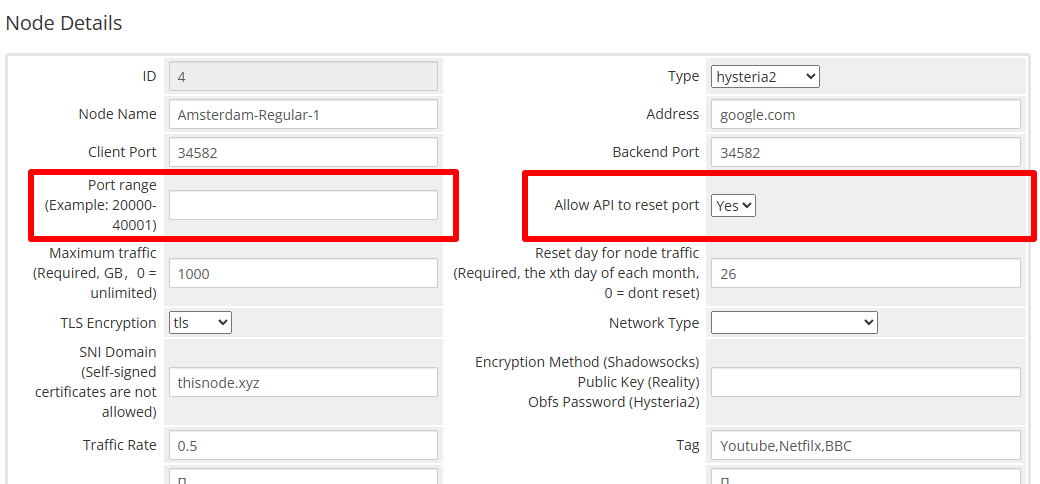
Port range
The port range available for the node backend. For example, if your VPS is a shared IP, the provider assigns you a port range of 20000-20300. Excluding port 20001 for SSH, the node backend can use a port range of 20002-20300
Allow API to reset port
Whether to allow the API to reset the port of this node
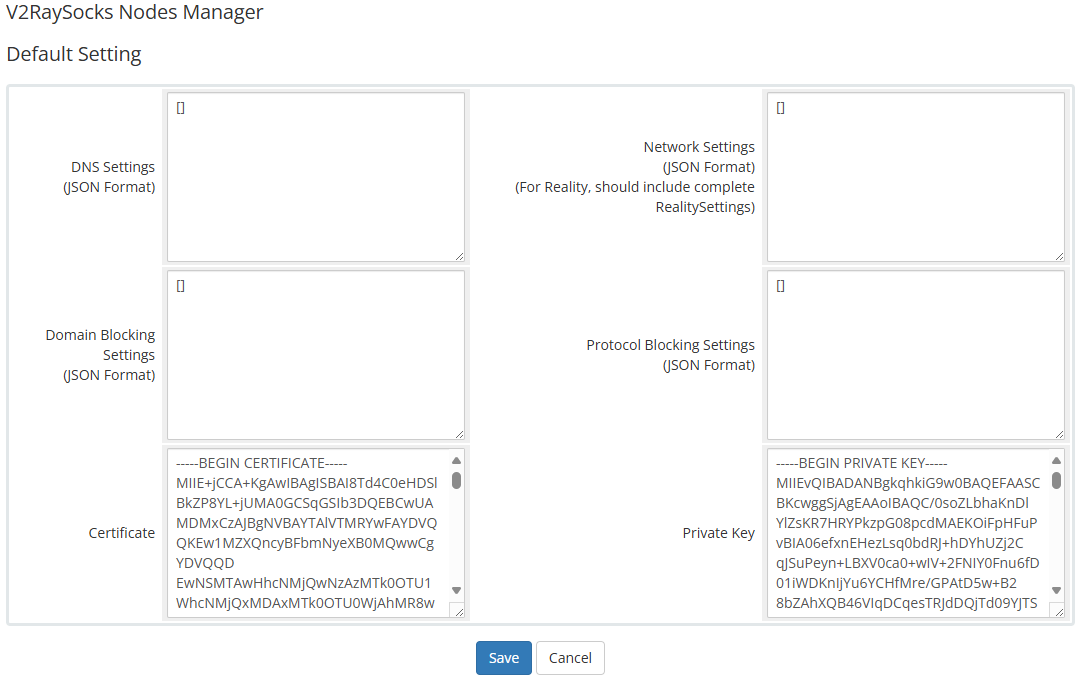
Default setting
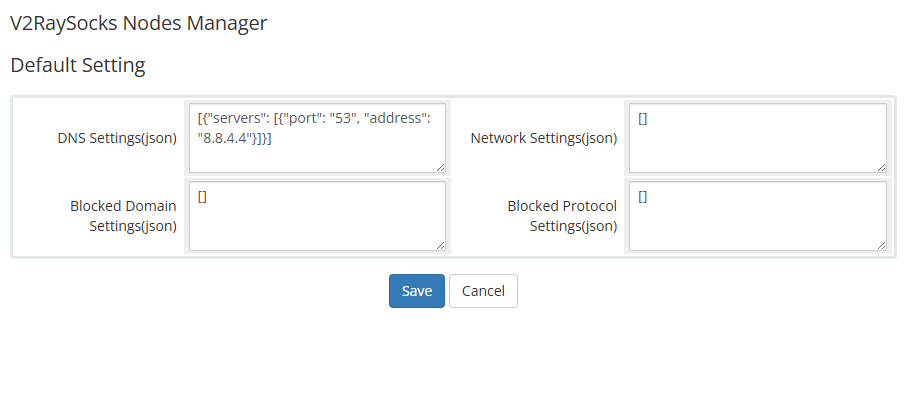
Default Setting
Fill in the relevant json in the default settings page. When the corresponding item in the node settings is empty, the settings here will be used.
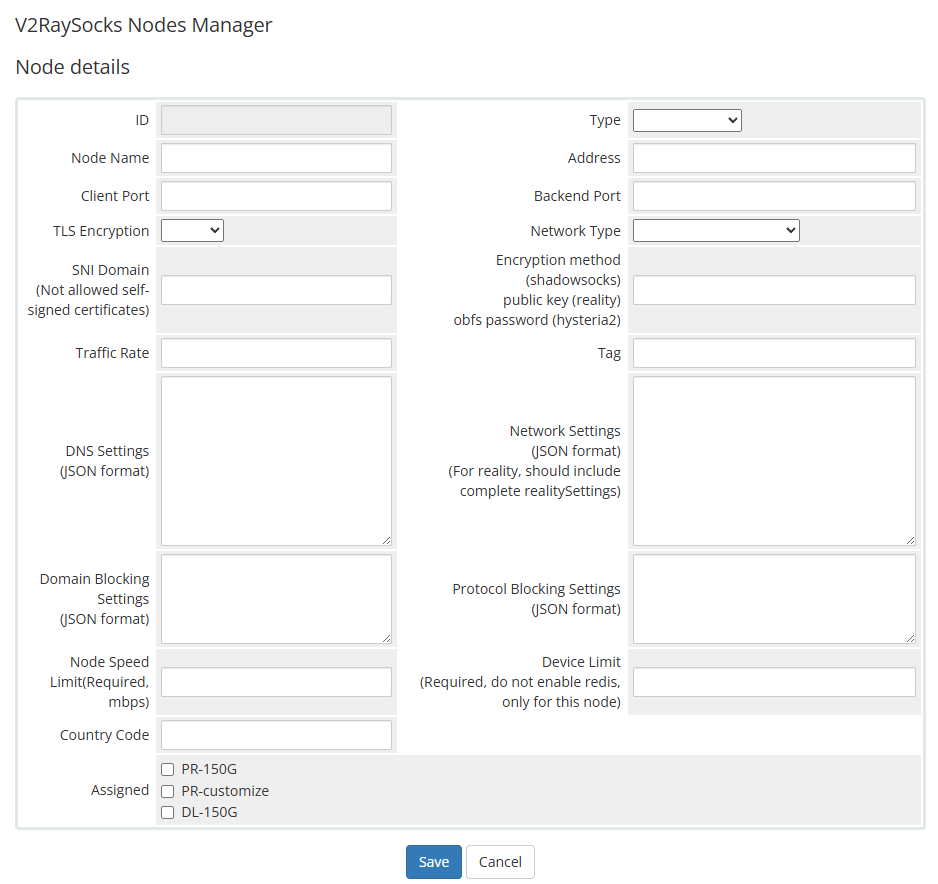
Add or edit nodes

Node details
| Columns | Tips |
|---|---|
| Node Name | The name of the node can be prefixed with [NumberLetter-] for sorting, such as 0A- in 0A-TEST-NODE-6. This prefix will not be displayed to users. |
| Address |
The address of the node, which can be an IP address or a domain name. If the node is forwarded, add the address of the forwarding server here. |
| Client Port |
The port of the node. If the node is forwarded, add the port of the forwarding server here. |
| Backend Port | The port on which the node backend runs |
| Traffic Rate | Traffic calculation factor |
Block domain
Currently, the blocked domains issued by the API are only valid in XrayR, When a user attempts to access a blocked domain, XrayR will report the number of times but will not record the details
In the node setting, you can set the list of domains blocked by the node, you can use the domain name directly or a regular expression. Please refer to the figure below
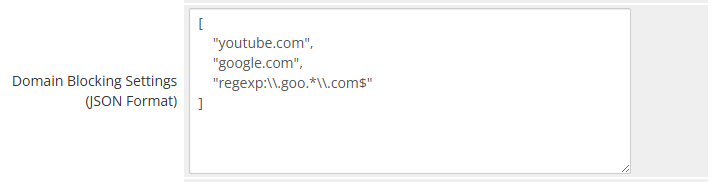
For Hysteria2, you need to set it in the server.yaml manually
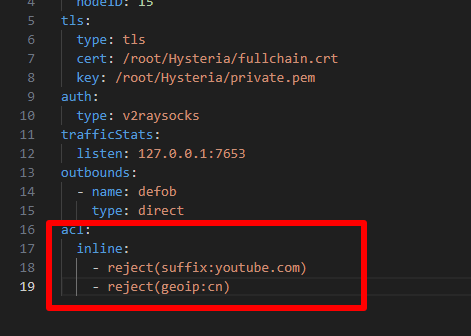
acl:
  inline:
    - reject(suffix:youtube.com)
    - reject(geoip:cn)
V2Milk
V2Milk is independent, it needs to be used with V2RaySocks-2024-07-22+, which you can purchase additionally.
Note that if you don't have the corresponding version of V2RaySocks, you won't be able to see this addon product!
Feature
- Support all Xray or Sing-box protocols
- Support global and pac modes
- Support multiple languages
- Support package information display
- Support humanized node display
- Support core log output
Tutorial
Download the file and unzip it, then package it according to the prompts
Preview


Node API
V2RaySocks's API uses query strings to complete verification and pull and push resources
Example:
https://yourdomain.com/web_api/?token=thisistoken&node_id=4&node_type=v2ray&act=user
Among them, token=thisistoken&node_id=4&node_type=v2ray is required. If
any one of them is missing, an error will be returned
node_type
node_type indicates the type of node
| Acceptable values | Corresponding protocol |
|---|---|
| v2ray | Vmess, VLESS |
| trojan | trojan |
| shadowsocks | shadowsocks-AEAD, shadowsocks-2022 |
| hysteria2 | hysteria2 |
act
act indicates the behavior of the node, the following values are supported
config
Get the config of the node, the API returns a json data, supports ETag
In principle, a standard Xray configuration file will be returned
{
    "api": {
        "services": [
            "HandlerService",
            "StatsService"
        ],
        "tag": "api"
    },
    "dns": [],
    "stats": {},
    "inbounds": [
        {
            "port": 36082,
            "protocol": "vmess",
            "settings": {
                "clients": []
            },
            "sniffing": {
                "enabled": true,
                "destOverride": [
                    "http",
                    "tls"
                ]
            },
            "streamSettings": {
                "network": "ws",
                "security": "tls",
                "tlsSettings": {
                    "certificates": [
                        {
                            "certificateFile": "/root/.cert/server.crt",
                            "keyFile": "/root/.cert/server.key"
                        }
                    ]
                },
                "wsSettings": {
                    "path": "/speedtest"
                }
            },
            "tag": "proxy"
        },
        {
            "listen": "127.0.0.1",
            "port": 1,
            "protocol": "dokodemo-door",
            "settings": {
                "address": "0.0.0.0"
            },
            "tag": "api"
        }
    ],
    "outbounds": [
        {
            "protocol": "freedom",
            "settings": {
                "domainStrategy": "UseIP"
            }
        },
        {
            "protocol": "blackhole",
            "tag": "block"
        }
    ],
    "routing": {
        "rules": [
            {
                "type": "field",
                "inboundTag": "api",
                "outboundTag": "api"
            },
            {
                "type": "field",
                "domain": [],
                "outboundTag": "block"
            },
            {
                "type": "field",
                "protocol": [],
                "outboundTag": "block"
            }
        ]
    },
    "policy": {
        "levels": {
            "0": {
                "handshake": 4,
                "connIdle": 300,
                "uplinkOnly": 5,
                "downlinkOnly": 30,
                "statsUserUplink": true,
                "statsUserDownlink": true
            }
        }
    }
}
The 0th {} of inbounds will be used as the node configuration, and the same, the 0th {} of the streamSettings, wsSettings, etc. (related to transport) are used as node configurations.
Please refer to XrayR , the implementation method is very simple
user
Get the user list of the node, the API returns a json data, supports ETag
v2ray and hysteria2
{
    "msg": "ok",
    "data": [
        {
            "id": 12,
            "uuid": "21DE8081-81E4-4525-A226-DCA408C4D603",
            "dt": 10,
            "st": 1
        },
        {
            "id": 13,
            "uuid": "EAF06CBA-4047-4A01-A4B5-02E15CD5E718",
            "dt": 10,
            "st": 1
        }
    ]
}
shadowsocks
{
    "msg": "ok",
    "data": [
        {
            "id": 12,
            "secret": "21DE8081-81E4-4525-A226-DCA408C4D603",
            "dt": 10,
            "st": 1
        },
        {
            "id": 13,
            "secret": "EAF06CBA-4047-4A01-A4B5-02E15CD5E718",
            "dt": 10,
            "st": 1
        }
    ]
}
trojan
{
    "msg": "ok",
    "data": [
        {
            "id": 12,
            "password": "21DE8081-81E4-4525-A226-DCA408C4D603",
            "dt": 10,
            "st": 1
        },
        {
            "id": 13,
            "password": "EAF06CBA-4047-4A01-A4B5-02E15CD5E718",
            "dt": 10,
            "st": 1
        }
    ]
}
dt indicates the device quantity limit, st indicates the speed limit (Mbps)
submit
Submit traffic usage data to V2RaySocks, accept a post request with json data
[
    {
        "uid": 1453,
        "u": 189773,
        "d": 52108028
    },
    {
        "uid": 2122,
        "u": 24518,
        "d": 46877
    },
    {
        "uid": 2379,
        "u": 591,
        "d": 5350
    },
    {
        "uid": 2392,
        "u": 2222,
        "d": 1207
    }
]
onlineusers
Submit the online user's IP to V2RaySocks, accept a post request with json data
Due to design issues, internal data can be duplicated
[
    {
        "uid": 1165323,
        "ip": "116.202.118.150"
    },
    {
        "uid": 1144103,
        "ip": "27.45.47.47"
    },
    {
        "uid": 1137593,
        "ip": "117.61.24.234"
    }
]
nodestatus
Submit node status data to V2RaySocks, accept a post request with json data
{
    "cpu": "0%",
    "mem": "13%",
    "net": "",
    "disk": "7%",
    "uptime": 4183063
}
illegal
Submit users who violated the rules to access the banned domain name to V2RaySocks, accept a post request with json data
Due to design issues, internal data can be duplicated
[
    {
        "uid": 1165985
    },
    {
        "uid": 1165985
    },
    {
        "uid": 1158653
    }
]
get_certificate
Get the node certificate stored in V2RaySocks
get_key
Get the node private key stored in V2RaySocks
Confirm post
All post requests will receive the following response indicating that the post has been successfully executed
{"msg":"ok","ret":200}
Or an error occurs
{"msg":"error","ret":500}
Customize template
Endpoint
In productdetails, you can get detailed information through the link below, including nodes and usage records, etc.
clientarea.php?action=productdetails&id=123&v2raysocksact=getuserinfo
Template
Place the template you wrote in modules/servers/V2RaySocks/templates. The template name should be the same as your whmcs template name and end with tpl.
If need to use other js or static files, please store them in modules/servers/V2RaySocks/templates/static
Hooks
How To Use
Copy the hook module you want to use and add it to the file V2RaySocks/hooks.php. Some modules may need simple settings, please set it as required
Automatically Accept Order
Let whmcs automatically review the purchase of new products that have been paid!
Before using, please modify the administrator username in the second line!
Work on WHMCS 7.x and 8.X
add_hook('AfterCronJob', 1, function($vars) {
    $adminUser = 'adminname';//Administrator username
    $command = 'GetOrders';
    $postData = [
        'limitnum' => 10000,
        'status' => 'Pending'
    ];
    $results = localAPI($command, $postData, $adminUser);
    if (isset($results['orders']['order'])) {
        foreach ($results['orders']['order'] as $order) {
            if ($order['paymentstatus'] === 'Paid' || $order['amount'] === '0.00') {
                $command = 'AcceptOrder';
                $postData = [
                    'orderid' => $order['id']
                ];
                $results = localAPI($command, $postData, $adminUser);
                if ($results['result'] !== 'success') {
                    $postData = array(
                        'description' => 'Accept order failed #' . $order['id'],
                    );
                    $command = 'LogActivity';
                    localAPI($command, $postData, $adminUser);
                }
            }
        }
    }
});
Bill payment control and guidance
Guide customers to correctly renew fees and control customer misoperations to generate abandoned bills
Work on WHMCS 7.x and 8.X
add_hook('ShoppingCartViewCartOutput', 1, function ($vars) {
  $unpaidinvoices = new WHMCS_ClientArea();
  if ($unpaidinvoices->isLoggedIn()) {
    $active_product_no = Capsule::table('tblhosting')->where('userid', $unpaidinvoices->getUserID())->where('domainstatus', 'Active')->count();
    $unpaid_invoice_no = Capsule::table('tblinvoices')->where('userid', $unpaidinvoices->getUserID())->where('status', 'Unpaid')->count();
    if ($active_product_no > 0 && $unpaid_invoice_no > 0) {
      echo '<script>if(confirm("You have ' . $active_product_no . ' effective products and ' . $unpaid_invoice_no . ' pending bills!\nBefore purchasing a new product, you must pay these bills first!\nPlease click confirm to pay the bill!")){location.href=\'clientarea.php?action=invoices\';}else{location.href=\'index.php\';};</script>';
    } elseif ($active_product_no > 0 && $unpaid_invoice_no == 0) {
      $return = '<div class="alert alert-warning text-center" role="alert">You have ' . $active_product_no . ' effective products, If you want to renew an existing product, please cancel this purchase, and the system will generate an order and notify you before the existing product expires!</br>If you want to purchase the product again (that is, you own two or more products at the same time), please complete this purchase!</div>';
      return $return;
    } elseif ($active_product_no = 0 && $unpaid_invoice_no > 0) {
      echo '<script>if(confirm("You have ' . $unpaid_invoice_no . ' pending bills!\nPlease click Confirm to end this purchase and check & pay the corresponding bill to complete the purchase!\nIf you want to purchase other products (products not corresponding to the generated bill), please click Cancel!")){location.href=\'clientarea.php?action=invoices\';};</script>';
    }
  }
});
Automatically cancel overdue orders and bills
Let WHMCS automatically cancel overdue orders and bills
Before using, please set the administrator username in the code and the time of automatic cancellation
Not tested yet
add_hook('DailyCronJob', 1, function ($vars) {
    $adminUser = 'adminname';//Administrator username
    $orderOverdueDays = 1;//Allow order overdue time(day)
    $invoiceOverdueDays = 10;//Allow bill overdue time(day)

    $now = Carbon::now();
    $now->hour = 0;
    $now->minute = 0;
    $now->second = 0;

    //Cancel order start
    $command = 'GetOrders';
    $postData = [
        'limitnum' => 10000,
        'status' => 'Pending'
    ];
    $results = localAPI($command, $postData, $adminUser);
    if (isset($results['orders']['order'])) {
        foreach ($results['orders']['order'] as $order) {
            $createDate = Carbon::parse($order['date']);
            $createDate->hour = 0;
            $createDate->minute = 0;
            $createDate->second = 0;
            if ($now->diffInDays($createDate) >= $orderOverdueDays) {
                $command = 'CancelOrder';
                $postData = [
                    'orderid' => $order['id']
                ];
                $results = localAPI($command, $postData, $adminUser);
                if ($results['result'] !== 'success') {
                    $postData = array(
                        'description' => 'Cancel order failed #' . $order['id'],
                    );
                    $command = 'LogActivity';
                    localAPI($command, $postData, $adminUser);
                }
            }
        }
    }
    //Cancel order end


    //Cancel invoices start
    $command = 'GetInvoices';
    $postData = [
        'limitnum' => 10000,
        'status' => 'Overdue'
    ];
    $results = localAPI($command, $postData, $adminUser);
    if (isset($results['invoices']['invoice'])) {
        foreach ($results['invoices']['invoice'] as $invoice) {
            $dueDate = Carbon::parse($invoice['duedate']);
            $dueDate->hour = 0;
            $dueDate->minute = 0;
            $dueDate->second = 0;
            if ($now->diffInDays($dueDate) >= $invoiceOverdueDays) {
                $command = 'UpdateInvoice';
                $postData = [
                    'invoiceid' => $invoice['id'],
                    'status' => 'Cancelled'
                ];
                $results = localAPI($command, $postData, $adminUser);
                if ($results['result'] === 'success') {
                    $postData = array(
                        'description' => 'Cancel invoice succeed #' . $invoice['id'],
                    );
                } else {
                    $postData = array(
                        'description' => 'Cancel invoice failed #' . $invoice['id'] . ';' . $results['message'],
                    );
                }
                $command = 'LogActivity';
                localAPI($command, $postData, $adminUser);
            }
        }
    }
    //Cancel invoices end
});
Mandatory account email authentication
Force users to verify their email address, otherwise they will refuse to access the product details page
Work on WHMCS 7.x and 8.X
add_hook('ClientAreaPageProductDetails', 1, function($var)
{
	$email_ca = new WHMCS_ClientArea();
	if ($email_ca->isLoggedIn()) {
		$adminuser = "adminname";
		$result = Capsule::table('tblclients')->where('id', '=', $email_ca->getUserID())->get()[0]->email_verified;
		if ($result == "0") {
			echo '<script>if(confirm("You have not verified your email, access is denied!\nPlease click confirm to back to homepage and verify email!\nPlease click cancel to modify account information!")){location.href=\'clientarea.php\';}else{location.href=\'clientarea.php?action=details\';};</script>';
			exit();
		}
	}
});
Restrict email suffix
Restrict users' registered email suffixes so that users can only use specific email addresses to register
Please set the available email suffix before use, use commas to separate the email suffix (in the third line of the code)
Work on WHMCS 7.x and 8.X
add_hook('ClientDetailsValidation', 1, function($vars) {
	$EmailAddress = explode('@',trim($vars['email']));
	$AllowAddress = 'baidu.com,qq.com,ter.com';
	$AllowAddressArray = array();
	$AllowAddressArray = explode(',',$AllowAddress);
	if(!@$EmailAddress[1]){
			return array('Incorrect email');
	} else {
			foreach ($AllowAddressArray as $AllowAddressForeach){
				if(strpos($EmailAddress[1],$AllowAddressForeach) !== true){
					return array('Email suffix is not allowed');
				}
			}
	}
});
Prohibit immediate cancellation
Prohibit immediate cancellation through hidden options
add_hook('ClientAreaFooterOutput', 1, function($vars) {
return <<<HTML
<script>$("option[value='Immediate']").remove(); </script>
HTML;
});
User Sharing
Tutorial
Log in and find User Management in the upper right corner
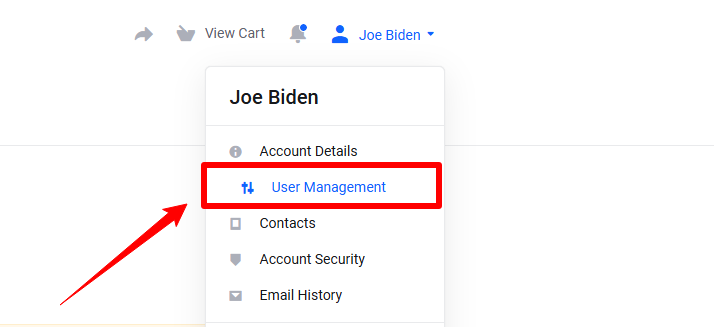
Click the button Invite New User
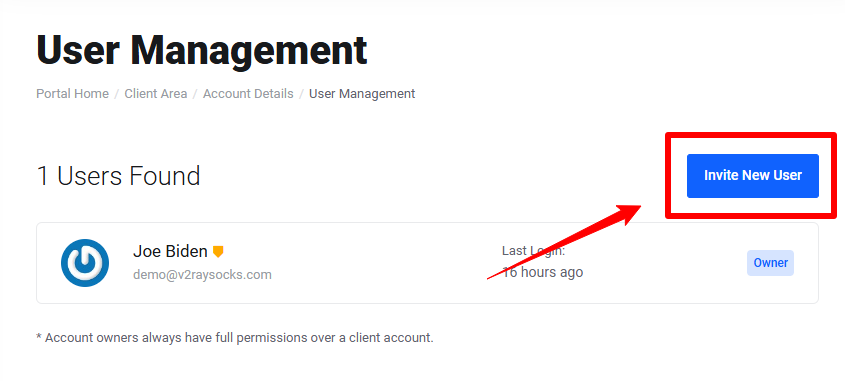
Enter the new user's email address and select the correct permissions

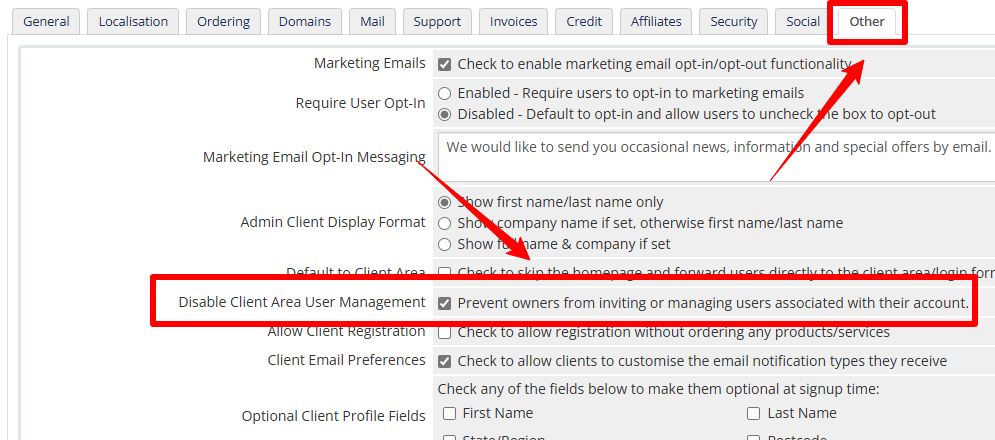
Disable
Recommended templates
Six
Built-in template for WHMCS, which can be enabled directly in settings
twenty-one
Built-in template for WHMCS v8+, which can be enabled directly in settings
Lagom2
A commercial template, which needs to be purchased at your own expense and can be customized
BNSCloud
A commercial template, which needs to be purchased at your own expense
Recommended VPS providers
The vps providers recommended here have multiple locations to choose from, and the prices and configurations are within a reasonable range!
VULTR

VULTR
Global, automated cloud infrastructure from the broadest array of NVIDIA GPUs to virtual CPUs, bare metal, Kubernetes, storage, and networking solutions.
Cheapest Package
- 1 vCPU
- 1 GB RAM
- 25 GB Disk
- 1 TB Traffic
- $5 /mo
Hivelocity

Hivelocity
High-Performance. Affordable. VPS & Dedicated Web Hosting.
Cheapest Package
- 1 vCPU
- 2 GB RAM
- 50 GB Disk
- 10 TB Traffic
- $4 /mo
is*hosting

is*hosting
Reliable dedicated and virtual private servers, customer support and constant quality control, more than 50 thousand customers, and 18 years of experience - this is is*hosting provider.
Cheapest Package
- 1 vCPU
- 1 GB RAM
- 20 GB Disk
- 2 TB Traffic
- $5 /mo
4VPS

4vps
Just feel the premium quality at amazingly low prices!
Cheapest Package
- 1 vCPU
- 1 GB RAM
- 10 GB Disk
- Unlimitied Traffic
- $4.5 /mo