Hysteria2 example
In WHMCS
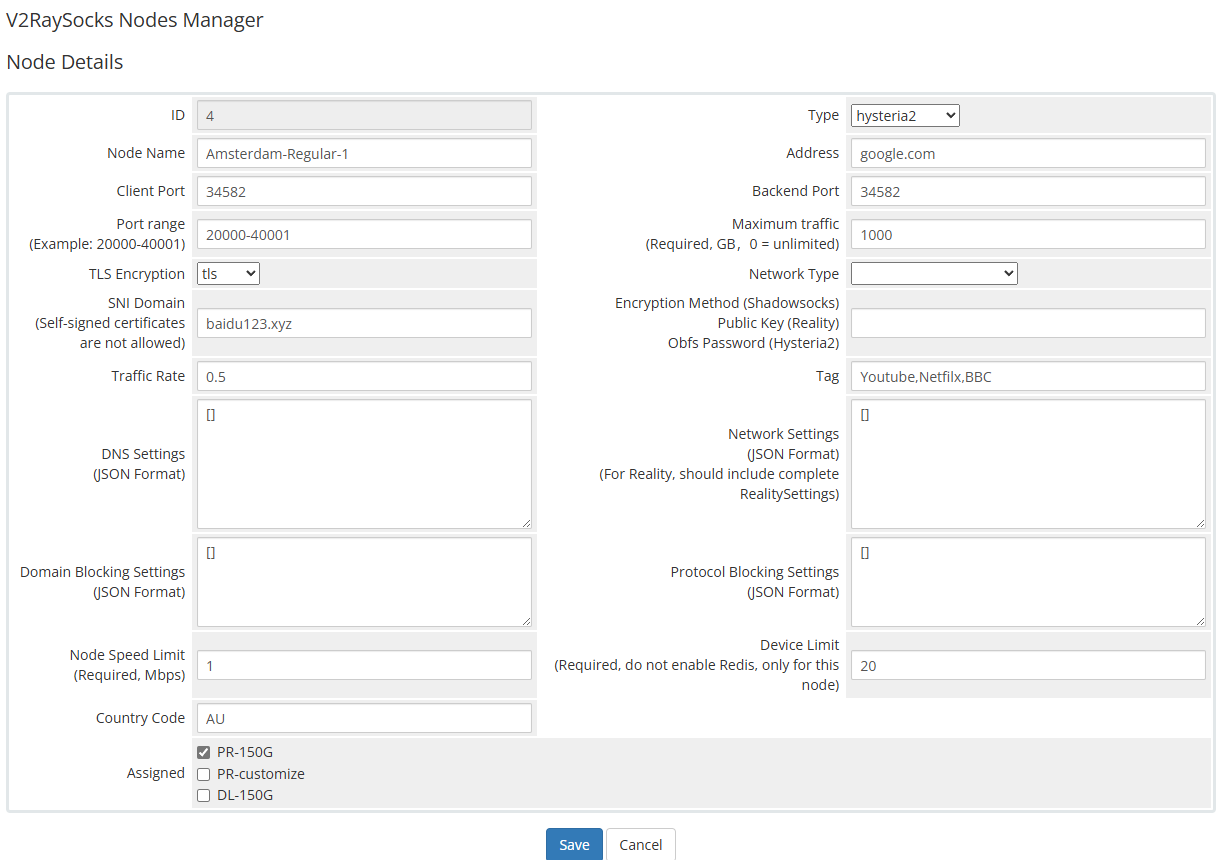
hysteria2
Install
Manual
This tutorial employs Ubuntu 22 as an illustrative example.
Initially, disable the Uncomplicated Firewall (UFW).
sudo ufw disable
If port hopping is required, kindly customize the provided command as per your requirements and execute it accordingly
In the provided command, users are permitted to utilize any port within the range of 20000 to 40000 for connecting to hysteria2, whereas the backend operates on port 40001
Please input "20000-40000" for the client port and "40001" for the backend port in the WHMCS node details
# install iptables-persistent
apt install iptables-persistent -y

# open 22,80,443 ports
iptables -A INPUT -p tcp --dport 22 -j ACCEPT
iptables -A INPUT -p tcp --dport 80 -j ACCEPT
iptables -A INPUT -p tcp --dport 443 -j ACCEPT

# turn on port forwarding
# IPv4
iptables -t nat -A PREROUTING -i eth0 -p udp --dport 20000:40000 -j DNAT --to-destination :40001
# IPv6
ip6tables -t nat -A PREROUTING -i eth0 -p udp --dport 20000:40000 -j DNAT --to-destination :40001

# save rule
sudo iptables-save > /etc/iptables/rules.v4
sudo ip6tables-save > /etc/iptables/rules.v6

sudo systemctl enable netfilter-persistent
sudo systemctl start netfilter-persistent
Please install the V2bX backend using the following command:
wget -N https://raw.githubusercontent.com/theresaarcher/V2bX-script/master/install.sh && bash install.sh
After installation, edit the configuration file /etc/V2bX/config.json as shown below:
{
    "Log": {
        "Level": "error",
        "Output": ""
    },
    "Cores": [
        {
            "Type": "hysteria2",
            "Log": {
                "Level": "error"
            }
        }
    ],
    "Nodes": [
        {
            "Core": "hysteria2",
            "ApiHost": "https://domain.com/modules/addons/v2raysocks_nodes/web_api.php",
            "ApiKey": "123456",
            "NodeID": 87,
            "NodeType": "hysteria2",
            "Hysteria2ConfigPath": "/etc/V2bX/hy2config.yaml",
            "Timeout": 30,
            "ListenIP": "",
            "SendIP": "0.0.0.0",
            "DeviceOnlineMinTraffic": 200,
            "CertConfig": {
                "CertMode": "self",
                "RejectUnknownSni": false,
                "CertDomain": "snidomain.com",
                "CertFile": "/etc/V2bX/fullchain.crt",
                "KeyFile": "/etc/V2bX/private.pem",
                "Email": "v2bx@github.com",
                "Provider": "cloudflare",
                "DNSEnv": {
                    "EnvName": "env1"
                }
            }
        }
    ]
}
Then upload your certificate files fullchain.crt and
private.pem to the directory /etc/V2bX/.
After configuration, start the V2bX backend using the following command:
v2bx
To restart or check the service status, use:
v2bx
V2bX will start automatically after the server reboots.
Modify
If you wish to adjust port forwarding rules, edit the rule files located in the following directory:
/etc/iptables
Then reload the rules with:
sudo systemctl restart netfilter-persistent